SpringBoot商品代购平台 开发过程
数据库设计
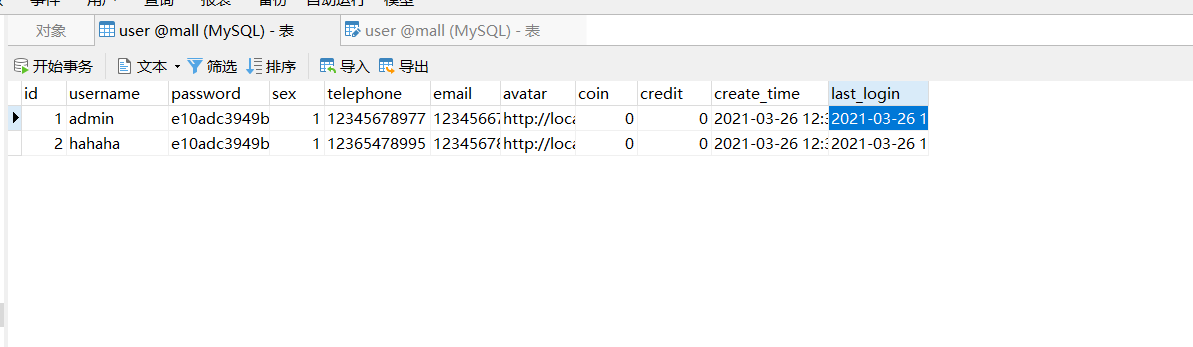
用户表
字段包括(用户id、用户名、密码、性别、电话、邮箱、用户头像、账户余额、信誉度、创建时间、上次登录时间)
-- ----------------------------
-- Table structure for user
-- ----------------------------
DROP TABLE IF EXISTS `user`;
CREATE TABLE `user`  (
  `id` bigint(0) NOT NULL AUTO_INCREMENT COMMENT '用户id',
  `username` varchar(25) CHARACTER SET utf8 COLLATE utf8_general_ci NOT NULL COMMENT '用户名',
  `password` varchar(64) CHARACTER SET utf8 COLLATE utf8_general_ci NOT NULL COMMENT '密码',
  `sex` tinyint(1) NULL DEFAULT NULL COMMENT '性别 0女1男',
  `telephone` varchar(20) CHARACTER SET utf8 COLLATE utf8_general_ci NOT NULL COMMENT '电话',
  `email` varchar(64) CHARACTER SET utf8 COLLATE utf8_general_ci NOT NULL COMMENT '邮箱',
  `avatar` varchar(25) CHARACTER SET utf8 COLLATE utf8_general_ci NULL DEFAULT NULL COMMENT '用户头像',
  `coin` float NULL DEFAULT 0 COMMENT '账户余额',
  `credit` int(0) NULL DEFAULT 0 COMMENT '信誉度',
  `create_time` datetime(0) NULL DEFAULT NULL COMMENT '创建时间',
  `last_login` datetime(0) NULL DEFAULT NULL COMMENT '上次登录时间',
  PRIMARY KEY (`id`) USING BTREE
) ENGINE = InnoDB CHARACTER SET = utf8 COLLATE = utf8_general_ci ROW_FORMAT = Dynamic;

SET FOREIGN_KEY_CHECKS = 1;
管理员表
字段包括(管理员id、账号、密码、创建时间)
-- ----------------------------
-- Table structure for admin
-- ----------------------------
DROP TABLE IF EXISTS `admin`;
CREATE TABLE `admin`  (
  `id` bigint(0) NOT NULL AUTO_INCREMENT COMMENT '管理员id',
  `username` varchar(25) CHARACTER SET utf8 COLLATE utf8_general_ci NOT NULL COMMENT '账号',
  `password` varchar(25) CHARACTER SET utf8 COLLATE utf8_general_ci NOT NULL COMMENT '密码',
  `create_time` datetime(0) NULL DEFAULT NULL COMMENT '创建时间',
  PRIMARY KEY (`id`) USING BTREE
) ENGINE = InnoDB
商品表
字段包括(订单id、商品名字、商品数量、商品价格、商品描述、商品图片、创建时间、乐观锁、用户id、分类id) –最后两个为外键
-- ----------------------------
-- Table structure for goods
-- ----------------------------
DROP TABLE IF EXISTS `goods`;
CREATE TABLE `goods`  (
  `id` bigint(0) NOT NULL AUTO_INCREMENT COMMENT '订单id',
  `name` varchar(50) CHARACTER SET utf8 COLLATE utf8_general_ci NOT NULL COMMENT '商品名字',
  `number` int(0) NULL DEFAULT 1 COMMENT '商品数量',
  `price` float NOT NULL COMMENT '商品价格',
  `description` text CHARACTER SET utf8 COLLATE utf8_general_ci NOT NULL COMMENT '商品描述',
  `img` varchar(25) CHARACTER SET utf8 COLLATE utf8_general_ci NULL DEFAULT NULL COMMENT '商品图片',
  `create_time` datetime(0) NULL DEFAULT NULL COMMENT '创建时间',
  `version` int(0) NULL DEFAULT 1 COMMENT '乐观锁',
  `uid` bigint(0) NOT NULL COMMENT '用户id',
  `cid` bigint(0) NULL DEFAULT NULL COMMENT '分类id',
  PRIMARY KEY (`id`) USING BTREE,
  INDEX `goods_category`(`cid`) USING BTREE,
  INDEX `user_goods`(`uid`) USING BTREE,
  CONSTRAINT `goods_category` FOREIGN KEY (`cid`) REFERENCES `category` (`id`) ON DELETE SET NULL ON UPDATE CASCADE,
  CONSTRAINT `user_goods` FOREIGN KEY (`uid`) REFERENCES `user` (`id`) ON DELETE RESTRICT ON UPDATE RESTRICT
) ENGINE = InnoDB CHARACTER SET = utf8 COLLATE = utf8_general_ci ROW_FORMAT = Dynamic;
购物车
字段包括(购物车id、买家、商品id) 买家和商品id为外键
-- ----------------------------
-- Table structure for cart
-- ----------------------------
DROP TABLE IF EXISTS `cart`;
CREATE TABLE `cart`  (
  `id` bigint(0) NOT NULL AUTO_INCREMENT COMMENT '购物车id',
  `uid` bigint(0) NOT NULL COMMENT '买家',
  `gid` bigint(0) NOT NULL COMMENT '商品id',
  PRIMARY KEY (`id`) USING BTREE,
  INDEX `cart_uid`(`uid`) USING BTREE,
  INDEX `cart_gid`(`gid`) USING BTREE,
  CONSTRAINT `cart_gid` FOREIGN KEY (`gid`) REFERENCES `goods` (`id`) ON DELETE RESTRICT ON UPDATE RESTRICT,
  CONSTRAINT `cart_uid` FOREIGN KEY (`uid`) REFERENCES `user` (`id`) ON DELETE RESTRICT ON UPDATE RESTRICT
) ENGINE = InnoDB CHARACTER SET = utf8 COLLATE = utf8_general_ci ROW_FORMAT = Dynamic;
分类表
字段包括(分类id、类别) –用来区分商品类别
-- ----------------------------
-- Table structure for category
-- ----------------------------
DROP TABLE IF EXISTS `category`;
CREATE TABLE `category`  (
  `id` bigint(0) NOT NULL AUTO_INCREMENT COMMENT '分类id',
  `name` varchar(10) CHARACTER SET utf8 COLLATE utf8_general_ci NULL DEFAULT NULL COMMENT '类别',
  PRIMARY KEY (`id`) USING BTREE
) ENGINE = InnoDB CHARACTER SET = utf8 COLLATE = utf8_general_ci ROW_FORMAT = Dynamic;
订单
字段包括(订单id、商品名、总价、收货人、联系方式、地址、交易状态、买家、创建时间) –买家为外键
-- ----------------------------
-- Table structure for order
-- ----------------------------
DROP TABLE IF EXISTS `order`;
CREATE TABLE `order`  (
  `id` bigint(0) NOT NULL AUTO_INCREMENT COMMENT '订单id',
  `name` varchar(25) CHARACTER SET utf8 COLLATE utf8_general_ci NOT NULL COMMENT '商品名',
  `price` float NOT NULL COMMENT '总价',
  `username` varchar(20) CHARACTER SET utf8 COLLATE utf8_general_ci NOT NULL COMMENT '收货人',
  `telephone` varchar(20) CHARACTER SET utf8 COLLATE utf8_general_ci NOT NULL COMMENT '联系方式',
  `address` varchar(255) CHARACTER SET utf8 COLLATE utf8_general_ci NOT NULL COMMENT '地址',
  `status` tinyint(1) NOT NULL COMMENT '交易状态\n1:未付款 2:未发货 3:正在路上 4:已确认收货 5:已评价',
  `uid` bigint(0) NOT NULL COMMENT '买家',
  `create_time` datetime(0) NULL DEFAULT NULL COMMENT '创建时间',
  PRIMARY KEY (`id`) USING BTREE,
  INDEX `uid`(`uid`) USING BTREE,
  CONSTRAINT `uid` FOREIGN KEY (`uid`) REFERENCES `user` (`id`) ON DELETE RESTRICT ON UPDATE RESTRICT
) ENGINE = InnoDB CHARACTER SET = utf8 COLLATE = utf8_general_ci ROW_FORMAT = Dynamic;
评论表
字段包括(评论id、评论人名字、评论内容、创建时间、所属商品)– 商品为外键
-- ----------------------------
-- Table structure for review
-- ----------------------------
DROP TABLE IF EXISTS `review`;
CREATE TABLE `review`  (
  `id` bigint(0) NOT NULL AUTO_INCREMENT COMMENT '评论id',
  `name` varchar(25) CHARACTER SET utf8 COLLATE utf8_general_ci NOT NULL COMMENT '评论人名字',
  `discuss` text CHARACTER SET utf8 COLLATE utf8_general_ci NOT NULL COMMENT '评论内容',
  `create_time` datetime(0) NULL DEFAULT NULL COMMENT '创建时间',
  `gid` bigint(0) NOT NULL COMMENT '所属商品',
  PRIMARY KEY (`id`) USING BTREE,
  INDEX `review_goods`(`gid`) USING BTREE,
  CONSTRAINT `review_goods` FOREIGN KEY (`gid`) REFERENCES `goods` (`id`) ON DELETE CASCADE ON UPDATE RESTRICT
) ENGINE = InnoDB CHARACTER SET = utf8 COLLATE = utf8_general_ci ROW_FORMAT = Dynamic;
公告
字段包括(公告、内容、创建时间)
-- ----------------------------
-- Table structure for notice
-- ----------------------------
DROP TABLE IF EXISTS `notice`;
CREATE TABLE `notice`  (
  `id` bigint(0) NOT NULL AUTO_INCREMENT COMMENT '公告',
  `inform` text CHARACTER SET utf8 COLLATE utf8_general_ci NULL COMMENT '内容',
  `create_time` datetime(0) NULL DEFAULT NULL COMMENT '创建时间',
  PRIMARY KEY (`id`) USING BTREE
) ENGINE = InnoDB CHARACTER SET = utf8 COLLATE = utf8_general_ci ROW_FORMAT = Dynamic;
后端项目创建
初步设想 SpringBoot + MybatisPlus + MySql + vue 搭建一个项目,数据库已经搭建好了,首先利用MyBatisPlus快速生成代码。我导入了Swagger2方便后面测试一下端口
依赖导入
导入依赖 pom.xml
 <!--热部署-->
<dependency>
    <groupId>org.springframework.boot</groupId>
    <artifactId>spring-boot-devtools</artifactId>
    <scope>runtime</scope>
    <optional>true</optional>
</dependency>
<!--数据库驱动-->
<dependency>
    <groupId>mysql</groupId>
    <artifactId>mysql-connector-java</artifactId>
    <scope>runtime</scope>
</dependency>
<dependency>
    <groupId>org.projectlombok</groupId>
    <artifactId>lombok</artifactId>
    <optional>true</optional>
</dependency>
<!--MyBatis-Plus  注意:不能和mybatis同时存在,否则会导致冲突-->
<dependency>
    <groupId>com.baomidou</groupId>
    <artifactId>mybatis-plus-boot-starter</artifactId>
    <version>3.4.2</version>
</dependency>
<!--MyBatisPlus代码生成器依赖-->
<dependency>
    <groupId>com.baomidou</groupId>
    <artifactId>mybatis-plus-generator</artifactId>
    <version>3.4.1</version>
</dependency>
<!--默认的模板引擎依赖 可改参考MyBatisPlus官方文档-->
<dependency>
    <groupId>org.apache.velocity</groupId>
    <artifactId>velocity-engine-core</artifactId>
    <version>2.2</version>
</dependency>
<!--swagger2-->
<dependency>
    <groupId>io.springfox</groupId>
    <artifactId>springfox-swagger2</artifactId>
    <version>2.9.2</version>
</dependency>
<!-- https://mvnrepository.com/artifact/io.springfox/springfox-swagger-ui -->
<dependency>
    <groupId>io.springfox</groupId>
    <artifactId>springfox-swagger-ui</artifactId>
    <version>2.9.1</version>
</dependency>
配置
application.yaml 本人比较喜欢yaml来配置
server:
  port: 8888
#DataSource Config
spring:
  datasource:
    driver-class-name: com.mysql.cj.jdbc.Driver
    url: jdbc:mysql://localhost:3306/mall?useUnicode=true&useSSL=false&characterEncoding=utf8&serverTimezone=Asia/Shanghai
    username: root
    password: 123456

# MyBatis-Plus
mybatis-plus:
  mapper-locations: classpath*:/mapper/**Mapper.xml  #xml文件的扫描路径
  configuration:
    log-impl: org.apache.ibatis.logging.stdout.StdOutImpl #默认的日志工具
config
新建config包
SwaggerConfig 导入Swagger2需要配置一些信息
package com.zdx.config;
import org.springframework.context.annotation.Bean;
import org.springframework.context.annotation.Configuration;
import springfox.documentation.builders.RequestHandlerSelectors;
import springfox.documentation.service.ApiInfo;
import springfox.documentation.service.Contact;
import springfox.documentation.spi.DocumentationType;
import springfox.documentation.spring.web.plugins.Docket;
import springfox.documentation.swagger2.annotations.EnableSwagger2;
import java.util.ArrayList;

@Configuration
@EnableSwagger2 //开启Swagger2
public class SwaggerConfig {
    @Bean
    public Docket docket(){
        return new Docket(DocumentationType.SWAGGER_2)
                .apiInfo(apiInfo())
                .select()
                .apis(RequestHandlerSelectors.basePackage("com.zdx.controller"))
                .build();
    }

    private ApiInfo apiInfo(){
        final Contact DEFAULT_CONTACT = new Contact("zdx", "https://zskyz233333.gitee.io/", "554***13@qq.com");
        return new ApiInfo(
                "zdx-swagger",
                "我希望每天叫醒我的不是闹钟,是梦想。",
                "v1.0",
                "https://zskyz233333.gitee.io/",
                DEFAULT_CONTACT,
                "Apache 2.0",
                "http://www.apache.org/licenses/LICENSE-2.0",
                new ArrayList());
    }
}
MybatisPlusConfig
开启mapper接口扫描,添加分页插件和乐观锁组件
新建一个包:通过@mapperScan注解指定要变成实现类的接口所在的包,然后包下面的所有接口在编译之后都会生成相应的实现类。PaginationInterceptor是一个分页插件。
package com.zdx.config;
import com.baomidou.mybatisplus.extension.plugins.OptimisticLockerInterceptor;
import com.baomidou.mybatisplus.extension.plugins.PaginationInterceptor;
import org.mybatis.spring.annotation.MapperScan;
import org.springframework.context.annotation.Bean;
import org.springframework.context.annotation.Configuration;
import org.springframework.transaction.annotation.EnableTransactionManagement;

@Configuration
@EnableTransactionManagement
@MapperScan("com.zdx.mapper")
public class MyBatisPlusConfig {
    //分页组件
    @Bean
    public PaginationInterceptor paginationInterceptor() {
        PaginationInterceptor paginationInterceptor = new PaginationInterceptor();
        return paginationInterceptor;
    }

    //乐观锁组件
    @Bean
    public OptimisticLockerInterceptor optimisticLockerInterceptor(){
        return new OptimisticLockerInterceptor();
    }
}
代码生成
新建一个代码生成器类负责生成代码
CodeProvide
package com.zdx;
import com.baomidou.mybatisplus.annotation.DbType;
import com.baomidou.mybatisplus.annotation.FieldFill;
import com.baomidou.mybatisplus.annotation.IdType;
import com.baomidou.mybatisplus.annotation.TableField;
import com.baomidou.mybatisplus.generator.AutoGenerator;
import com.baomidou.mybatisplus.generator.config.*;
import com.baomidou.mybatisplus.generator.config.po.TableFill;
import com.baomidou.mybatisplus.generator.config.rules.DateType;
import com.baomidou.mybatisplus.generator.config.rules.NamingStrategy;
import java.util.ArrayList;
// 代码自动生成器
public class CodeProvider {
    public static void main(String[] args) {
        // 需要构建一个 代码自动生成器 对象
        AutoGenerator mpg = new AutoGenerator();
        // 配置策略
        // 1、全局配置
        GlobalConfig gc = new GlobalConfig();
        String projectPath = System.getProperty("user.dir");//获取当前项目目录
        gc.setOutputDir(projectPath+"/src/main/java");//输出的项目路径
        gc.setAuthor("朱德鑫");//设置作者
        gc.setOpen(false);//不打开资源管理器
        gc.setFileOverride(false); // 是否覆盖
        gc.setServiceName("%sService"); // 去Service的I前缀
        gc.setIdType(IdType.ASSIGN_ID);//设置默认id算法
        gc.setDateType(DateType.ONLY_DATE);//设置日期类型
        gc.setSwagger2(true);//开启Swagger2
        mpg.setGlobalConfig(gc);
        //2、设置数据源
        DataSourceConfig dsc = new DataSourceConfig();
        dsc.setUrl("jdbc:mysql://localhost:3306/mall?useUnicode=true&useSSL=false&characterEncoding=utf8&serverTimezone=Asia/Shanghai");
        dsc.setDriverName("com.mysql.cj.jdbc.Driver");
        dsc.setUsername("root");
        dsc.setPassword("123456");
        dsc.setDbType(DbType.MYSQL);//设置数据库类型为MySql
        mpg.setDataSource(dsc);
        //3、包的配置
        PackageConfig pc = new PackageConfig();
        pc.setModuleName(null);//生成模块名,可以去掉
        pc.setParent("com.zdx");//输出包下
        pc.setEntity("entity");//对应包名
        pc.setMapper("mapper");
        pc.setService("service");
        pc.setController("controller");
        mpg.setPackageInfo(pc);
        //4、策略配置
        StrategyConfig strategy = new StrategyConfig();
        strategy.setInclude("user","review","order","notice","goods","category","cart","admin"); // 设置要映射的表名可多个
        strategy.setNaming(NamingStrategy.underline_to_camel);//设置包命名规则,下划线转驼峰命名
        strategy.setColumnNaming(NamingStrategy.underline_to_camel);//设置列命名规则,下划线转驼峰命名
        strategy.setEntityLombokModel(true); // 自动lombok;

        //自动填充配置
        TableFill creatTime = new TableFill("create_time", FieldFill.INSERT); //创建时间
        ArrayList<TableFill> tableFills = new ArrayList<>();
        tableFills.add(creatTime);
        strategy.setTableFillList(tableFills);
        strategy.setVersionFieldName("version"); // 乐观锁
        strategy.setRestControllerStyle(true);
        strategy.setControllerMappingHyphenStyle(true);
        mpg.setStrategy(strategy);
        mpg.execute(); //执行
    }
}
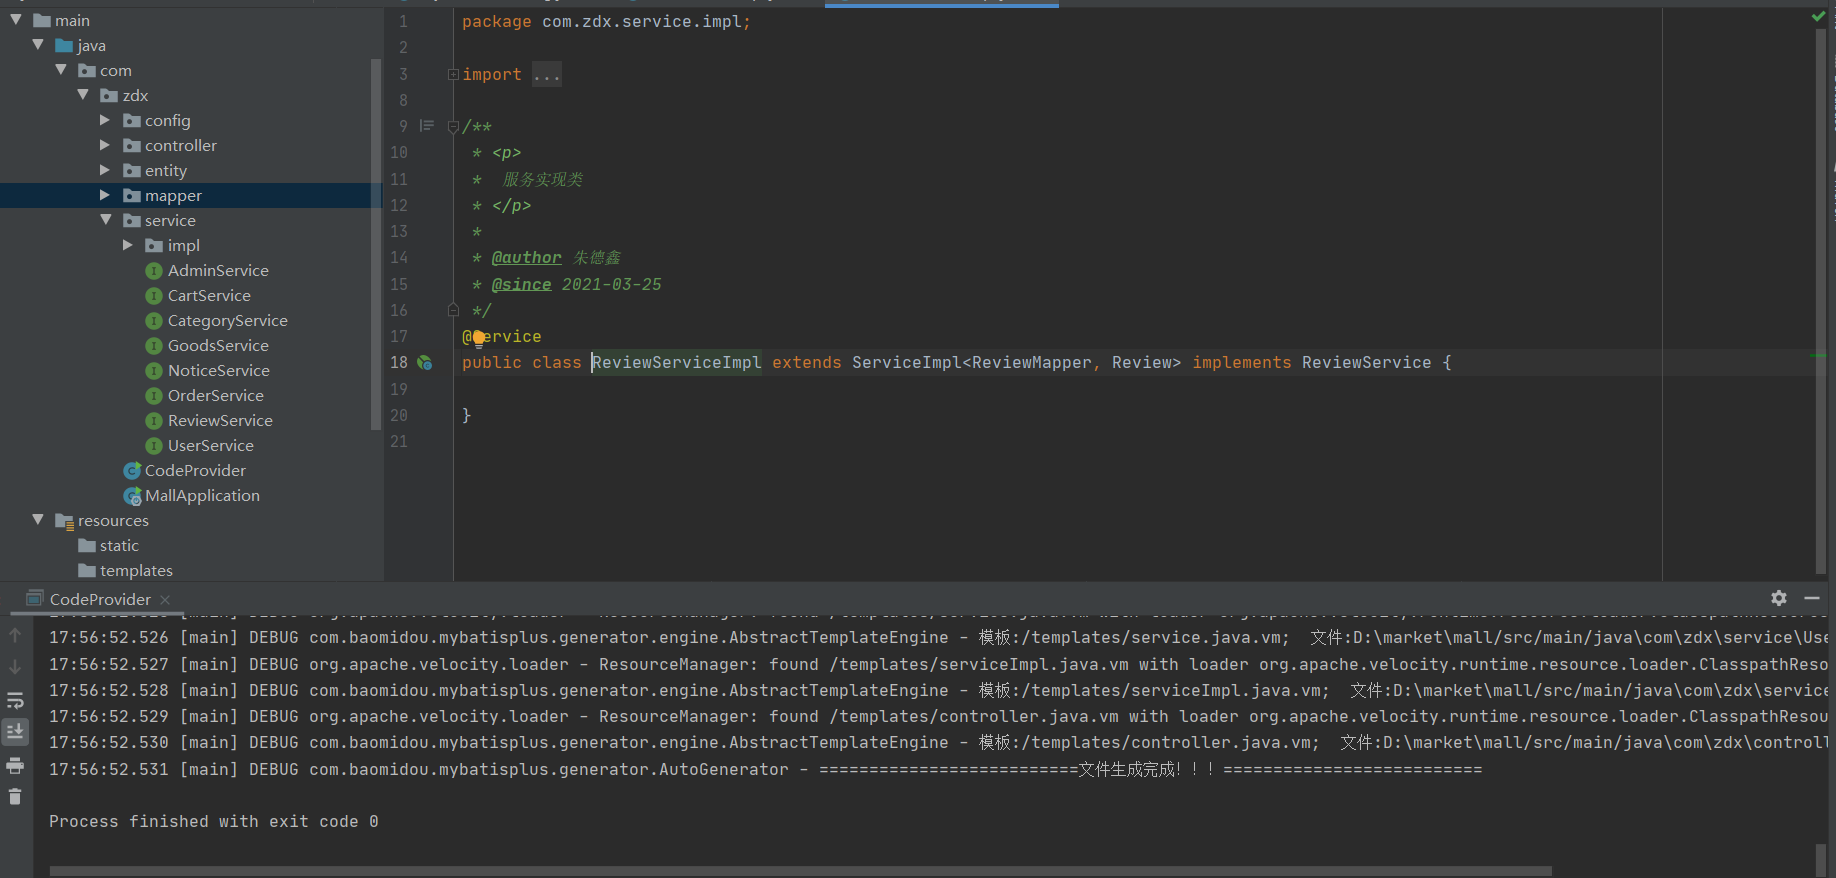
执行代码生成的main方法,然后项目的基本骨架就搭建好啦。
前端项目搭建
统一结果封装类
这个类负责对后端返回给前端的结果进行封装,暂时有以下几个元素
- 状态码 code 表示是否成功
- 结果消息 message 输出返回的消息或者报错信息
- 结果数据 data
新建common包创建Result类
Result
import lombok.Data;

import java.io.Serializable;


@Data
public class Result implements Serializable {
    private Integer code; //是否成功参数  200成功
    private String msg; //结果消息
    private Object data; //返回的结果数据

    public Result(Integer code, String msg, Object data) {
        this.code = code;
        this.msg = msg;
        this.data = data;
    }

    //成功的例子
    public static Result success(Object data){
        return Result.success(200,"成功",data);  //利用重载方便开发
    }
    public static Result success(Integer code,String msg,Object data){
        Result r = new Result(code,msg,data);
        return r;
    }

    //失败
    public static Result fail(String msg){
        return Result.fail(msg,null);  //利用重载方便开发
    }
    public static Result fail(String msg,Object data){
        return Result.fail(400,msg,data);  //利用重载方便开发
    }
    public static Result fail(Integer code,String msg,Object data){
        Result r = new Result(code,msg,data);
        return r;
    }
}
整合Shiro+jwt+redis 实现会话共享
- 当我们使用了nginx做负载均衡,使用了多个web服务器时,我们的请求会根据配置的权重信息自动分配到配置的负载服务器上,这时,客户端发起的request并不能指定到同一台web服务器上,这时,shiro默认的ehcache来实现共享缓存比较麻烦,这里直接使用redis做共享缓存,把缓存统一保存在一个地方,这样即可解决web服务器缓存共享问题。
- 因为是前后端分离项目所以我们一般使用token或者jwt作为跨域身份验证解决方案。在整合shiro的过程中,我们需要引入jwt的身份验证过程。
1.导入开源项目中shiro-redis-spring-boot-starter启动器,可以查看官方文档 https://github.com/alexxiyang/shiro-redis/blob/master/docs/README.md#spring-boot-starter
2.导入jwt的工具包,引入了hutool工具包(简化开发)。
注意 使用shiro-redis-spring-boot-starter,如果也使用了spring-boot-devtools热部署的话需要在resources/META-INF/spring-devtools.properties创建这个文件并添加
restart.include.shiro-redis=/shiro-[\\w-\\.]+jar<!--整合Shiro 和 Redis 注意在yaml中的redis配置有些不一样 参考:http://alexxiyang.github.io/shiro-redis/-->
<dependency>
<groupId>org.crazycake</groupId>
<artifactId>shiro-redis-spring-boot-starter</artifactId>
<version>3.2.1</version>
</dependency>
<!-- hutool工具类-->
<dependency>
<groupId>cn.hutool</groupId>
<artifactId>hutool-all</artifactId>
<version>5.3.3</version>
</dependency>
<!-- jwt -->
<dependency>
<groupId>io.jsonwebtoken</groupId>
<artifactId>jjwt</artifactId>
<version>0.9.1</version>
</dependency>
<!--使用@ConfigurationProperties注解要导这个包就不会爆红了-->
<dependency>
<groupId> org.springframework.boot </groupId>
<artifactId> spring-boot-configuration-processor </artifactId>
<optional> true </optional>
</dependency>修改yaml配置
# shiro-redis的配置
shiro-redis:
  enable: true
  redis-manager:
    host: "127.0.0.1:6379"
    password: "******"

zdx:
  jwt:
    #加密密钥
    secret: f4e2e52034348f86b67cde581c0f9eb5
    # token有效时长 七天 单位秒
    expire: 604800
    header: Authorization
ShiroConfig
ShiroConfig
import org.apache.shiro.mgt.SecurityManager;
import org.apache.shiro.mgt.SessionsSecurityManager;
import org.apache.shiro.session.mgt.SessionManager;
import org.apache.shiro.spring.web.ShiroFilterFactoryBean;
import org.apache.shiro.spring.web.config.DefaultShiroFilterChainDefinition;
import org.apache.shiro.spring.web.config.ShiroFilterChainDefinition;
import org.apache.shiro.web.mgt.DefaultWebSecurityManager;
import org.apache.shiro.web.session.mgt.DefaultWebSessionManager;
import org.crazycake.shiro.RedisCacheManager;
import org.crazycake.shiro.RedisSessionDAO;
import org.springframework.beans.factory.annotation.Autowired;
import org.springframework.context.annotation.Bean;
import org.springframework.context.annotation.Configuration;
import javax.servlet.Filter;
import java.util.HashMap;
import java.util.LinkedHashMap;
import java.util.Map;

@Configuration
public class ShiroConfig {

    @Autowired
    JwtFilter jwtFilter;

    @Bean
    public SessionManager sessionManager(RedisSessionDAO redisSessionDAO){
        DefaultWebSessionManager sessionManager = new DefaultWebSessionManager();

        sessionManager.setSessionDAO(redisSessionDAO);
        return sessionManager;
    }

    @Bean
    public SessionsSecurityManager securityManager(AccountRealm accountRealm, SessionManager sessionManager, RedisCacheManager redisCacheManager){
        DefaultWebSecurityManager securityManager = new DefaultWebSecurityManager(accountRealm);

        securityManager.setSessionManager(sessionManager);
        securityManager.setCacheManager(redisCacheManager);

         /*
         * 关闭shiro自带的session,详情见文档
         */
        DefaultSubjectDAO subjectDAO = new DefaultSubjectDAO();
        DefaultSessionStorageEvaluator defaultSessionStorageEvaluator = new DefaultSessionStorageEvaluator();
        defaultSessionStorageEvaluator.setSessionStorageEnabled(false);
        subjectDAO.setSessionStorageEvaluator(defaultSessionStorageEvaluator);
        securityManager.setSubjectDAO(subjectDAO);

        return securityManager;
    }

    @Bean
    public ShiroFilterChainDefinition shiroFilterChainDefinition() {
        DefaultShiroFilterChainDefinition chainDefinition = new DefaultShiroFilterChainDefinition();
        Map<String, String> filterMap = new LinkedHashMap<>();
        filterMap.put("/**", "jwt"); // 主要通过注解方式校验权限 所有链接都会经过jwt
        chainDefinition.addPathDefinitions(filterMap);
        return chainDefinition;
    }
    @Bean("shiroFilterFactoryBean")
    public ShiroFilterFactoryBean shiroFilterFactoryBean(SecurityManager securityManager,
                                                         ShiroFilterChainDefinition shiroFilterChainDefinition) {
        ShiroFilterFactoryBean shiroFilter = new ShiroFilterFactoryBean();
        shiroFilter.setSecurityManager(securityManager);

        Map<String, Filter> filters = new HashMap<>();
        filters.put("jwt", jwtFilter);
        shiroFilter.setFilters(filters);

        Map<String, String> filterMap = shiroFilterChainDefinition.getFilterChainMap();
        shiroFilter.setFilterChainDefinitionMap(filterMap);
        return shiroFilter;
    }
}
redisSessionDAO 和 redisCacheManager爆红是正常的并不影响程序运行,至于其他未找到类错误是因为这些实体类在后面才创建。
上面ShiroConfig主要做了几个事情:
- 引入RedisSessionDAO和RedisCacheManager,为了解决shiro的权限数据和会话信息能保存到redis中,实现会话共享。
- 重写了SessionManager和DefaultWebSecurityManager,同时在DefaultWebSecurityManager中为了关闭shiro自带的session方式,我们需要设置为false,这样用户就不再能通过session方式登录shiro。后面将采用jwt凭证登录。
- 在ShiroFilterChainDefinition中,我们不再通过编码形式拦截Controller访问路径,而是所有的路由都需要经过JwtFilter这个过滤器,然后判断请求头中是否含有jwt的信息,有就登录,没有就跳过。跳过之后,有Controller中的shiro注解进行再次拦截,比如@RequiresAuthentication,这样控制权限访问。
JwtUtil
JwtUtil
package com.zdx.util;

import io.jsonwebtoken.Claims;
import io.jsonwebtoken.Jwts;
import io.jsonwebtoken.SignatureAlgorithm;
import lombok.Data;
import lombok.extern.slf4j.Slf4j;
import org.springframework.boot.context.properties.ConfigurationProperties;
import org.springframework.stereotype.Component;

import java.util.Date;

/**
 * jwt工具类 JwtUtils是个生成和校验jwt的工具类,其中有些jwt相关的密钥信息是从项目配置文件中配置的
 */
@Slf4j
@Data
@Component
@ConfigurationProperties(prefix = "zdx.jwt") //需要导包就不会报红spring-boot-configuration-processor
public class JwtUtils {

    private String secret;
    private long expire;
    private String header;

    /**
     * 生成jwt
     */
    public String generateToken(long userId) {
        Date nowDate = new Date();
        //过期时间
        Date expireDate = new Date(nowDate.getTime() + expire * 1000);

        return Jwts.builder()
                .setHeaderParam("typ", "JWT")
                .setSubject(userId+"")
                .setIssuedAt(nowDate)
                .setExpiration(expireDate)
                .signWith(SignatureAlgorithm.HS512, secret)
                .compact();
    }

    public Claims getClaimByToken(String token) {
        try {
            return Jwts.parser()
                    .setSigningKey(secret)
                    .parseClaimsJws(token)
                    .getBody();
        }catch (Exception e){
            log.debug("validate is token error ", e);
            return null;
        }
    }

    /**
     * token是否过期
     * @return  true:过期
     */
    public boolean isTokenExpired(Date expiration) {
        return expiration.before(new Date());
    }
}
UserProfile
UserProfile
package com.zdx.shiro;

import lombok.Data;

import java.io.Serializable;

//登录成功之后返回的一个用户信息的载体,
@Data
public class UserProfile implements Serializable {

    private Long id;

    private String username;

    private String email;

    private String password;

    private Integer status;
}
hiro默认supports的是UsernamePasswordToken,而我们现在采用了jwt的方式,所以这里我们自定义一个JwtToken,来完成shiro的supports方法。
JwtToken
JwtToken
package com.zdx.shiro;

import org.apache.shiro.authc.AuthenticationToken;

public class JwtToken implements AuthenticationToken {

    private String token;

    public JwtToken(String jwt) {
        this.token = jwt;
    }
    @Override
    public Object getPrincipal() {
        return token;
    }

    @Override
    public Object getCredentials() {
        return token;
    }
}
MallRealm是shiro进行登录或者权限校验的逻辑所在:
- supports:为了让realm支持jwt的凭证校验
- doGetAuthorizationInfo:权限校验
- doGetAuthenticationInfo:登录认证校验
MallRealm
MallRealm
package com.zdx.shiro;

import cn.hutool.core.bean.BeanUtil;
import com.zdx.entity.User;
import com.zdx.service.UserService;
import com.zdx.util.JwtUtils;
import org.apache.shiro.authc.*;
import org.apache.shiro.authz.AuthorizationInfo;
import org.apache.shiro.realm.AuthorizingRealm;
import org.apache.shiro.subject.PrincipalCollection;
import org.springframework.beans.factory.annotation.Autowired;
import org.springframework.stereotype.Component;

@Component
public class MallRealm extends AuthorizingRealm {
    @Autowired
    JwtUtils jwtUtils;

    @Autowired
    UserService userService;

    @Override
    public boolean supports(AuthenticationToken token) {
        return token instanceof JwtToken;
    }

    //获取用户信息后查看权限返回shiro  认证
    @Override
    protected AuthorizationInfo doGetAuthorizationInfo(PrincipalCollection principalCollection) {
        return null;
    }

    //进行密码校验   授权
    @Override
    protected AuthenticationInfo doGetAuthenticationInfo(AuthenticationToken token) throws AuthenticationException {
        JwtToken jwtToken = (JwtToken) token;

        String userId = jwtUtils.getClaimByToken((String)jwtToken.getPrincipal()).getSubject(); //获取userId
        User user = userService.getById(Long.valueOf(userId));

        if(user == null){
            throw new UnknownAccountException("账号不存在");
        }

        UserProfile userProfile = new UserProfile(); //存放用户基本信息
        BeanUtil.copyProperties(user,userProfile); //利用hutool工具包的工具讲user对象的属性copy到accountProfile对象
        return new SimpleAuthenticationInfo(userProfile,jwtToken.getCredentials(),getName());
    }
}
这里我继承的是Shiro内置的AuthenticatingFilter,一个可以内置了可以自动登录方法的的过滤器:
- createToken:实现登录,我们需要生成我们自定义支持的JwtToken
- onAccessDenied:拦截校验,当头部没有Authorization时候,我们直接通过,不需要自动登录;当带有的时候,首先我们校验jwt的有效性,没问题我们就直接执行executeLogin方法实现自动登录
- onLoginFailure:登录异常时候进入的方法,我们直接把异常信息封装然后抛出
- preHandle:拦截器的前置拦截,因为我们是前后端分析项目,项目中除了需要跨域全局配置之外,我们再拦截器中也需要提供跨域支持。这样,拦截器才不会在进入Controller之前就被限制了。
JwtFilter
JwtFilter
package com.zdx.shiro;

import cn.hutool.json.JSONUtil;
import com.zdx.common.Result;
import com.zdx.util.JwtUtils;
import io.jsonwebtoken.Claims;
import org.apache.shiro.authc.AuthenticationException;
import org.apache.shiro.authc.AuthenticationToken;
import org.apache.shiro.authc.ExpiredCredentialsException;
import org.apache.shiro.web.filter.authc.AuthenticatingFilter;
import org.apache.shiro.web.util.WebUtils;
import org.springframework.beans.factory.annotation.Autowired;
import org.springframework.stereotype.Component;
import org.springframework.util.StringUtils;
import org.springframework.web.bind.annotation.RequestMethod;

import javax.servlet.ServletRequest;
import javax.servlet.ServletResponse;
import javax.servlet.http.HttpServletRequest;
import javax.servlet.http.HttpServletResponse;
import java.io.IOException;

@Component
public class JwtFilter extends AuthenticatingFilter {
    @Autowired
    JwtUtils jwtUtils;

    @Override
    protected AuthenticationToken createToken(ServletRequest servletRequest, ServletResponse servletResponse) throws Exception {
        HttpServletRequest request = (HttpServletRequest) servletRequest;
        String jwt = request.getHeader("Authorization");

        if(StringUtils.isEmpty(jwt)){
            return null;
        }
        return new JwtToken(jwt);
    }

    @Override
    protected boolean onAccessDenied(ServletRequest servletRequest, ServletResponse servletResponse) throws Exception {

        //获取token
        HttpServletRequest request = (HttpServletRequest) servletRequest;
        String jwt = request.getHeader("Authorization");

        if(StringUtils.isEmpty(jwt)){
            return true;
        }else {

            //校验jwt
            Claims claims = jwtUtils.getClaimByToken(jwt);
            if(claims == null || jwtUtils.isTokenExpired(claims.getExpiration())){
                throw new ExpiredCredentialsException("token已失效,请重新登录");
            }
            //执行登录
            return executeLogin(servletRequest, servletResponse);
        }
    }

    @Override
    protected boolean onLoginFailure(AuthenticationToken token, AuthenticationException e, ServletRequest request, ServletResponse response) {

        HttpServletResponse httpServletResponse = (HttpServletResponse)response; //返回信息给前端
        //处理登录失败的异常
        try {
            Throwable throwable = e.getCause() == null ? e : e.getCause();
            Result result = Result.fail(throwable.getMessage()); //获取异常信息
            String json = JSONUtil.toJsonStr(result); //将result对象转换为Json字符串


            httpServletResponse.getWriter().print(json); //将信息打印出去
        }catch (IOException ioException){

        }

        return false;
    }

    /**
     * 对跨域提供支持
     */
    @Override
    protected boolean preHandle(ServletRequest request, ServletResponse response) throws Exception {
        HttpServletRequest httpServletRequest = WebUtils.toHttp(request);
        HttpServletResponse httpServletResponse = WebUtils.toHttp(response);
        httpServletResponse.setHeader("Access-control-Allow-Origin", httpServletRequest.getHeader("Origin"));
        httpServletResponse.setHeader("Access-Control-Allow-Methods", "GET,POST,OPTIONS,PUT,DELETE");
        httpServletResponse.setHeader("Access-Control-Allow-Headers", httpServletRequest.getHeader("Access-Control-Request-Headers"));
        // 跨域时会首先发送一个OPTIONS请求,这里我们给OPTIONS请求直接返回正常状态
        if (httpServletRequest.getMethod().equals(RequestMethod.OPTIONS.name())) {
            httpServletResponse.setStatus(org.springframework.http.HttpStatus.OK.value());
            return false;
        }
        return super.preHandle(request, response);
    }
}
ShiroUtil
ShiroUtil
package com.zdx.util;

import com.zdx.shiro.AccountProfile;
import org.apache.shiro.SecurityUtils;

public class ShiroUtil {

    //返回shiro当前subject中用户
    public static AccountProfile getProfile(){
        return (AccountProfile)SecurityUtils.getSubject().getPrincipal();
    }
}
全局异常处理
使用@ControllerAdvice来进行统一异常处理,@ExceptionHandler(value = RuntimeException.class)来指定捕获的Exception各个类型异常 ,这个异常的处理,是全局的,所有类似的异常,都会跑到这个地方处理。
定义全局异常处理,@ControllerAdvice表示定义全局控制器异常处理,@ExceptionHandler表示针对性异常处理,可对每种异常针对性处理。
GlobalExceptionHandler
package com.zdx.exception;

import com.zdx.common.Result;
import lombok.extern.slf4j.Slf4j;
import org.apache.shiro.ShiroException;
import org.springframework.http.HttpStatus;
import org.springframework.validation.BindingResult;
import org.springframework.validation.ObjectError;
import org.springframework.web.bind.MethodArgumentNotValidException;
import org.springframework.web.bind.annotation.ExceptionHandler;
import org.springframework.web.bind.annotation.ResponseStatus;
import org.springframework.web.bind.annotation.RestControllerAdvice;

@Slf4j
@RestControllerAdvice  //全局异常捕获
public class GlobalExceptionHandler {


    //捕捉shiro异常
    @ResponseStatus(HttpStatus.UNAUTHORIZED) //返回一个状态码给前端
    @ExceptionHandler(ShiroException.class) //捕获shiro相关异常 如登录不成功或者权限不够
    public Result handler(ShiroException e){
        log.error("shiro异常------------"+e);
        return Result.fail(401,e.getMessage(),null);
    }

    //实体校验异常
    @ResponseStatus(HttpStatus.BAD_REQUEST) //返回一个状态码给前端
    @ExceptionHandler(MethodArgumentNotValidException.class) //捕获运行时异常
    public Result handler(MethodArgumentNotValidException e){
        log.error("实体校验异常------------"+e);

        BindingResult bindingResult = e.getBindingResult(); // 获取全部的实体校验异常
        ObjectError objectError = bindingResult.getAllErrors().stream().findFirst().get(); //只返回其中一个异常

        return Result.fail(objectError.getDefaultMessage());
    }

    //Assert断言异常 在登录控制器中
    @ResponseStatus(HttpStatus.BAD_REQUEST) //返回一个状态码给前端
    @ExceptionHandler(IllegalArgumentException.class) //捕获运行时异常
    public Result handler(IllegalArgumentException e){
        log.error("断言时异常------------"+e);
        return Result.fail(e.getMessage());
    }

    @ResponseStatus(HttpStatus.BAD_REQUEST) //返回一个状态码给前端
    @ExceptionHandler(RuntimeException.class) //捕获运行时异常
    public Result handler(RuntimeException e){
        log.error("运行时异常------------"+e);
        return Result.fail(e.getMessage());
    }
}
实体校验
导入依赖
<!--用于实体校验-->
<dependency>
    <groupId>org.springframework.boot</groupId>
    <artifactId>spring-boot-starter-validation</artifactId>
</dependency>
例子
package com.zdx.entity;

import com.baomidou.mybatisplus.annotation.IdType;

import java.time.LocalDateTime;
import java.util.Date;
import com.baomidou.mybatisplus.annotation.Version;
import com.baomidou.mybatisplus.annotation.TableId;
import com.baomidou.mybatisplus.annotation.FieldFill;
import com.baomidou.mybatisplus.annotation.TableField;
import java.io.Serializable;
import io.swagger.annotations.ApiModel;
import io.swagger.annotations.ApiModelProperty;
import lombok.Data;
import lombok.EqualsAndHashCode;

import javax.validation.constraints.Email;
import javax.validation.constraints.NotBlank;

/**
 * <p>
 *
 * </p>
 *
 * @author 朱德鑫
 * @since 2021-03-25
 */
@Data
@EqualsAndHashCode(callSuper = false)
@ApiModel(value="User对象", description="")
public class User implements Serializable {

    private static final long serialVersionUID = 1L;

    @ApiModelProperty(value = "用户id")
    @TableId(value = "id", type = IdType.AUTO)
    private Long id;

    @ApiModelProperty(value = "用户名")
    @NotBlank(message = "用户名不能为空")
    private String username;

    @ApiModelProperty(value = "密码")
    @NotBlank(message = "密码不能为空")
    private String password;

    @ApiModelProperty(value = "性别 0女1男")
    private Boolean sex;

    @ApiModelProperty(value = "电话")
    private String telephone;

    @ApiModelProperty(value = "邮箱")
    @NotBlank(message = "邮箱不能为空")
    @Email(message = "邮箱格式不正确")
    private String email;

    @ApiModelProperty(value = "用户头像")
    private String avatar;

    @ApiModelProperty(value = "账户余额")
    private Float coin;

    @ApiModelProperty(value = "信誉度")
    private Integer credit;

    @ApiModelProperty(value = "创建时间")
    @TableField(fill = FieldFill.INSERT)
    @JsonFormat(pattern = "yyyy-MM-dd") //对日期格式化 不然前端收到的格式是这样的 "2021-03-26T23:03:42"
    private LocalDateTime createTime;

    @ApiModelProperty(value = "上次登录时间")
    @JsonFormat(pattern = "yyyy-MM-dd") //对日期格式化 不然前端收到的格式是这样的 "2021-03-26T23:03:42"
    private LocalDateTime lastLogin;
}
其他几个就不一一举例 ,注意需要对日期时间格式化 @JsonFormat(pattern = “yyyy-MM-dd”) //对日期格式化 不然前端收到的格式是这样的 “2021-03-26T23:03:42”
MyWebConfig
解决跨域问题
MyWebConfig
package com.zdx.config;

import org.springframework.context.annotation.Configuration;
import org.springframework.web.servlet.config.annotation.CorsRegistry;
import org.springframework.web.servlet.config.annotation.ResourceHandlerRegistry;
import org.springframework.web.servlet.config.annotation.WebMvcConfigurer;

/**
 * 全局配置解决跨域问题
 */
@Configuration
public class MyWebConfig implements WebMvcConfigurer {

    /**
     2      * 就是注册的过程,注册Cors协议的内容。
     3      * 如: Cors协议支持哪些请求URL,支持哪些请求类型,请求时处理的超时时长是什么等。
     4      */
    @Override
    public void addCorsMappings(CorsRegistry registry){
        registry.addMapping("/**") // 所有的当前站点的请求地址,都支持跨域访问。
                .allowedOriginPatterns("*")  // 所有的外部域都可跨域访问。 如果是localhost则很难配置,因为在跨域请求的时候,外部域的解析可能是localhost、127.0.0.1、主机名
                .allowedMethods("GET", "HEAD", "POST", "PUT", "DELETE", "OPTIONS") // 当前站点支持的跨域请求类型是什么。
                .allowCredentials(true) // 是否支持跨域用户凭证
                .maxAge(3600)  // 超时时长设置为1小时。 时间单位是秒。
                .allowedHeaders("*");
    }


    //图片上传 跟我们设置的图片资源文件夹,即 D:/market/img/ 对应起来
    @Override
    public void addResourceHandlers(ResourceHandlerRegistry registry) {
        registry.addResourceHandler("/img/file/**").addResourceLocations("file:" + "d:/market/img/");
    }

}
StringUtil
用于生成一串随机字符串
package com.zdx.util;

import java.util.Random;

public class StringUtil {
    public static String getRandomString(int length) {
        String base = "abcdefghijklmnopqrstuvwxyz0123456789";
        Random random = new Random();
        StringBuffer sb = new StringBuffer();
        for (int i = 0; i < length; i++) {
            int number = random.nextInt(base.length());
            sb.append(base.charAt(number));
        }
        return sb.toString();
    }
}
后端框架骨架搭建基本完成了 剩下的就是业务逻辑的处理了。
前端项目搭建
现在先搭建好一个vue项目(前提准备好vue-cli脚手架)
新建一个名为mall-vue的前端项目
vue init webpack mall-vue一路按y
安装element-ui
用idea打开前端项目在控制台输入
npm install element-ui --save打开项目src目录下的main.js,引入element-ui依赖。
import Element from 'element-ui' //全局引入element-ui依赖
import "element-ui/lib/theme-chalk/index.css"
Vue.config.productionTip = false
Vue.use(Element) //全局使用element
安装axios
通过axios前后端请求发送
npm install axios --save安装成功后在main.js导入依赖
import axios from 'axios' //全局引入axios
Vue.prototype.$axios = axios //可以通过this.$axios.get()来发起我们的请求
/* eslint-disable no-new */
new Vue({
  el: '#app',
  router,
  store: store,
  components: { App },
  template: '<App/>'
})
引入 Vuex
Vuex是专门为 Vue 开发的状态管理方案,我们可以把需要在各个组件中传递使用的变量、方法定义在这里.
npm install vuex --save在 src 目录下新建一个文件夹 store,并在该目录下新建 index.js 文件,在该文件中引入 vue 和 vuex,代码如下:
import Vue from 'vue'
import Vuex from 'vuex'

Vue.use(Vuex)
基本页面
App.vue
<template>
  <div id="app">
    <router-view/>
  </div>
</template>

<script>
export default {
  name: 'App'
}
</script>

<style>
#app {
  font-family: 'Avenir', Helvetica, Arial, sans-serif;
  -webkit-font-smoothing: antialiased;
  -moz-osx-font-smoothing: grayscale;
  text-align: center;
  color: #2c3e50;
}
*{
  padding: 0;
  margin: 0;
}
</style>
Login.vue
<template>
  <body id="poster">
  <el-form :model="ruleForm" :rules="rules" ref="ruleForm" label-width="100px" class="login-container">
    <el-form-item label="用户名" prop="username">
      <el-input type="text" maxlength="12" v-model="ruleForm.username"></el-input>
    </el-form-item>
    <el-form-item  label="密码" prop="password">
      <el-input type="password" v-model="ruleForm.password"></el-input>
    </el-form-item>
    <el-form-item>
      <el-button type="primary" @click="submitForm('ruleForm')">登录</el-button>
      <el-button type="primary" @click="resetForm()">注册</el-button>
    </el-form-item>
  </el-form>
  </body>
</template>

<script>

  export default {
    name: 'Login',
    data() {
      return {
        ruleForm: {
          username: '',
          password: ''
        },
        rules: {
          username: [
            { required: true, message: '请输入用户名', trigger: 'blur' },
            { min: 3, max:12, message: '长度在 3 到 12 个字符', trigger: 'blur' }
          ],
          password: [
            { required: true, message: '请输入密码', trigger: 'blur' }
          ]
        }
      };
    },
    methods: {
      submitForm(formName) {
        this.$refs[formName].validate((valid) => {
          if (valid) {
            // 提交逻辑
            const _this = this
            this.$axios.post('/login', this.ruleForm).then((res)=>{
              console.log(res.headers)
              const jwt = res.headers['authorization']
              const userInfo = res.data.data //后端返回的对象信息
              //把数据放进store 全局共享
              _this.$store.commit("SET_TOKEN",jwt)
              _this.$store.commit("SET_USERINFO",userInfo)
              //登录成功后跳转
              _this.$router.push('/mall')
            })
          } else {
            console.log('error submit!!');
            return false;
          }
        });
      },
      resetForm() {
        this.$router.push('/register')
      }
    }
  }
</script>

<style scoped>
  #poster{
    background:url("../assets/login.jpg") no-repeat;
    background-position: center;
    height: 100%;
    width: 100%;
    background-size: cover;
    position: fixed;
  }
  body{
    margin: 0px;
  }
  .login-container {
    border-radius: 15px;
    background-clip: padding-box;
    margin: 90px auto;
    width: 350px;
    padding: 35px 35px 15px 35px;
    background: #fff;
    border: 1px solid #eaeaea;
    box-shadow: 0 0 25px #cac6c6;
  }

  .login_title {
    margin: 0px auto 40px auto;
    text-align: center;
    color: #505458;
  }
  .login_remember {
    margin: 0px 0px 35px 0px;
    text-align: left;
  }
</style>
ImgUpLoad
<template>
  <el-upload
    class="img-upload"
    ref="upload"
    action="http://localhost:8888/upLoadImg"
    :on-preview="handlePreview"
    :on-remove="handleRemove"
    :before-remove="beforeRemove"
    :on-success="handleSuccess"
    multiple
    :limit="1"
    :on-exceed="handleExceed"
    :file-list="fileList">
    <el-button size="small" type="primary">点击上传</el-button>
    <div slot="tip" class="el-upload__tip">只能上传jpg/png文件,且不超过500kb</div>
  </el-upload>
</template>

<script>
  export default {
    name: 'ImgUpload',
    data () {
      return {
        fileList: [],
        url: ''
      }
    },
    methods: {
      handleRemove (file, fileList) {
      },
      handlePreview (file) {
      },
      handleExceed (files, fileList) {
        this.$message.warning(`当前限制选择 1 个文件,本次选择了 ${files.length} 个文件,共选择了 ${files.length + fileList.length} 个文件`)
      },
      beforeRemove (file, fileList) {
        return this.$confirm(`确定移除 ${file.name}?`)
      },
      handleSuccess (response) {
        this.url = response
        this.$emit('onUpLoad')
        this.$message.warning('上传成功')
      },
      clear () {
        this.$refs.upload.clearFiles()
      }
    }
  }
</script>
Register
<template>
  <body id="poster">
  <el-form :model="userForm" :rules="rules" ref="userForm" label-width="100px" class="login-container">
    <el-form-item label="用户名" prop="username">
      <el-input type="text" maxlength="12" v-model="userForm.username"></el-input>
    </el-form-item>
    <el-form-item  label="密码" prop="password">
      <el-input type="password" v-model="userForm.password"></el-input>
    </el-form-item>
    <el-form-item  label="性别" prop="avatar">
      <el-radio v-model="userForm.sex" label="1">男</el-radio>
      <el-radio v-model="userForm.sex" label="0">女</el-radio>
    </el-form-item>
    <el-form-item  label="手机号" prop="email">
      <el-input type="number" v-model="userForm.telephone"></el-input>
    </el-form-item>
    <el-form-item  label="邮箱" prop="email">
      <el-input type="email" v-model="userForm.email"></el-input>
    </el-form-item>
    <el-form-item  label="头像" prop="avatar">
      <el-input v-model="userForm.avatar" autocomplete="off" placeholder="图片 URL"></el-input>
      <ImgUpLoad @onUpLoad="upLoadImg" ref="imgUpload"></ImgUpLoad>
    </el-form-item>
    <el-form-item>
      <el-button type="primary" @click="submitForm('userForm')">注册</el-button>
      <el-button @click="resetForm('userForm')">重置</el-button>
    </el-form-item>
  </el-form>
  </body>
</template>

<script>
  import ImgUpLoad from "./utils/ImgUpLoad";
  export default {
    name: "register",
    components: {ImgUpLoad},
    data() {
      return {
        userForm: {
          username: '',
          password: '',
          sex: 1,
          telephone: '',
          avatar: '',
          email: ''
        },
        rules: {
          username: [
            { required: true, message: '请输入用户名', trigger: 'blur' },
            { min: 3, max:12, message: '长度在 3 到 12 个字符', trigger: 'blur' }
          ],
          password: [
            { required: true, message: '请输入密码', trigger: 'blur' }
          ],
          telephone: [
            { required: true, message: '请输手机号', trigger: 'blur'},
            { min: 11, message: '请输入正确的手机号', trigger: 'blur' }
          ],
          email: [
            { required: true, message: '请输入邮箱', trigger: 'blur'}
          ]
        }
      };
    },
    methods: {
      upLoadImg() {
        this.userForm.avatar = this.$refs.imgUpload.url
      },
      submitForm(formName) {
        this.$refs[formName].validate((valid) => {
          if (valid) {
            // 提交逻辑
            const _this = this
            this.$axios.post('/register', this.userForm).then((res)=>{
              console.log(res.headers)
              _this.$router.push('/login')
            })
          } else {
            console.log('error submit!!');
            return false;
          }
        });
      },
      resetForm(formName) {
        this.$refs[formName].resetFields();
      }
    }
  }
</script>

<style scoped>
  #poster{
    background:url("../assets/login.jpg") no-repeat;
    background-position: center;
    height: 100%;
    width: 100%;
    background-size: cover;
    position: fixed;
  }
  body{
    margin: 0px;
  }
  .login-container {
    border-radius: 15px;
    background-clip: padding-box;
    margin: 90px auto;
    width: 350px;
    padding: 35px 35px 15px 35px;
    background: #fff;
    border: 1px solid #eaeaea;
    box-shadow: 0 0 25px #cac6c6;
  }
</style>
页面路由
所以的页面都要在路由中注册
router下index.js
import Vue from 'vue'
import Router from 'vue-router'
import Login from "../components/Login";
import Register from "../components/Register";


Vue.use(Router)

const routes = [
  {
    path: '/login',
    name: 'login',
    component: Login
  },
  {
    path: '/register',
    name: 'register',
    component: Register
  }
];
const router = new Router({
  mode: 'history',
  base: process.env.BASE_URL,
  routes
})
export default router
到这里基本的前端项目搭建好了 看看效果 npm run dev:

接下来就是各个功能的开发了。
注册功能
思路 前端利用Element-ui的验证表单验证信息格式是否正确,后端也有实体类校验,发送post请求,前端处理请求结果成功跳转登录页面。
前端
在前面注册页面完成时,this.$axios.post的路径是’/register’ 其实是不完整的,完整路径应该是’http://localhost:8888/register'。但是每个请求都这样写未免有些重复,我们应该专注于具体内容,所有我们可以设置默认的axios请求头http://localhost:8888 ,其次我们后端每次返回的都是Result结果类,我们也应该先提前拦截,根据结果进行成功或者失败处理。
在src下新建axios.js 实现上述功能
import axios from 'axios' //导入axios配置
import Element from 'element-ui'
import router from './router'
import store from './store'
axios.defaults.baseURL="http://localhost:8888" //设置前后端传输时的默认前缀

//前置拦截
axios.interceptors.request.use(config => {
  // 可以统一设置请求头
  return config
})

//后置拦截
axios.interceptors.response.use(response => {
  const res = response.data;
  //后端返回数据后判断code
  if (res.code === 200) {
    return response
  } else if (res.code === 400) {  //实体校验错误
    Element.Message.error(res.msg)
    return Promise.reject(response.data.msg)
  }
 },
  error => {
    if(error.response.data) {
      error.message = error.response.data.msg
    }
    // 根据请求状态觉得是否登录或者提示其他
    if (error.response.status === 401) {
      store.commit('REMOVE_INFO');
      router.push({
        path: '/login'
      });
      error.message = '请重新登录';
    }
    if (error.response.status === 403) {
      error.message = '权限不足,无法访问';
    }
    Element.Message({
      message: error.message,
      type: 'error',
      duration: 3 * 1000
    })
    return Promise.reject(error)
})
注意记得在main.js中配置不然不会生效
import './axios' //配置全局异常处理token状态同步
这一步是登录中的的,从返回的结果请求头中获取到token的信息,然后使用store提交token和用户信息的状态。
在store/index.js修改
import Vue from 'vue'
import Vuex from 'vuex'

Vue.use(Vuex)

export default new Vuex.Store({
  state: {
    token: '',
    userInfo: JSON.parse(sessionStorage.getItem('userInfo')) //反序列化 是一个json字符串
  },
  mutations: {
    //set 通过这里给state中的属性赋值
    SET_TOKEN: (state,token) => {
      state.token = token //赋值
      localStorage.setItem('token',token) //放进浏览器中 关闭浏览器 还能存在
    },
    SET_USERINFO: (state,userInfo) => {
      state.userInfo = userInfo //赋值
      sessionStorage.setItem('userInfo',JSON.stringify(userInfo))
    },
    REMOVE_INFO: (state) => {
      state.token = ''
      state.userInfo = {}
      localStorage.setItem('token','')
      sessionStorage.setItem('userInfo',JSON.stringify(''))
    },
  },
  getters: {
    //get
    getUser: state => {
      return state.userInfo
    }

  },
  actions: {},
  modules: {}
})
前端注册的页面开发完成了,现在就需要实现后端的接口。
后端
在后端中新建SystemController
SystemController
package com.zdx.controller;
import cn.hutool.crypto.SecureUtil;
import com.baomidou.mybatisplus.core.conditions.query.QueryWrapper;
import com.zdx.common.Result;
import com.zdx.entity.User;
import com.zdx.service.UserService;
import com.zdx.util.StringUtil;
import org.springframework.beans.factory.annotation.Autowired;
import org.springframework.validation.annotation.Validated;
import org.springframework.web.bind.annotation.CrossOrigin;
import org.springframework.web.bind.annotation.PostMapping;
import org.springframework.web.bind.annotation.RequestBody;
import org.springframework.web.bind.annotation.RestController;
import org.springframework.web.multipart.MultipartFile;
import org.springframework.web.util.HtmlUtils;
import java.io.File;
import java.io.IOException;
import java.time.LocalDateTime;
@RestController
public class SystemController {
@Autowired
UserService userService;
//图片上传
@CrossOrigin
@PostMapping("/upLoadImg")
public String coversUpload(MultipartFile file) throws Exception {
String folder = "D:/market/img/";
File imageFolder = new File(folder);
File f = new File(imageFolder, StringUtil.getRandomString(11) + file.getOriginalFilename()
.substring(file.getOriginalFilename().length() - 4));
if (!f.getParentFile().exists())
f.getParentFile().mkdirs();
try {
file.transferTo(f);
String imgURL = "http://localhost:8888/img/file/" + f.getName();
return imgURL;
} catch (IOException e) {
e.printStackTrace();
return "";
}
}
//注册功能
@PostMapping("/register")
public Result register(@Validated @RequestBody User user){ //@Validated 实体类校验
String username = user.getUsername();
username = HtmlUtils.htmlEscape(username); //防止xss攻击
user.setUsername(username);
//判断用户名和手机号是否存在
User u = userService.getOne(new QueryWrapper<User>().eq("username",user.getUsername())
User u2 = userService.getOne(new QueryWrapper<User>().eq("telephone",user.getTelephone()));
if(u != null || u2 != null){
return Result.fail("用户名或手机号已注册");
}
//密码MD5加密 利用hutool工具的SecureUtil.md5
String password = SecureUtil.md5(user.getPassword());
user.setPassword(password);
user.setLastLogin(LocalDateTime.now()); //设置登录的时间
userService.save(user);
return Result.success(null) ;
}
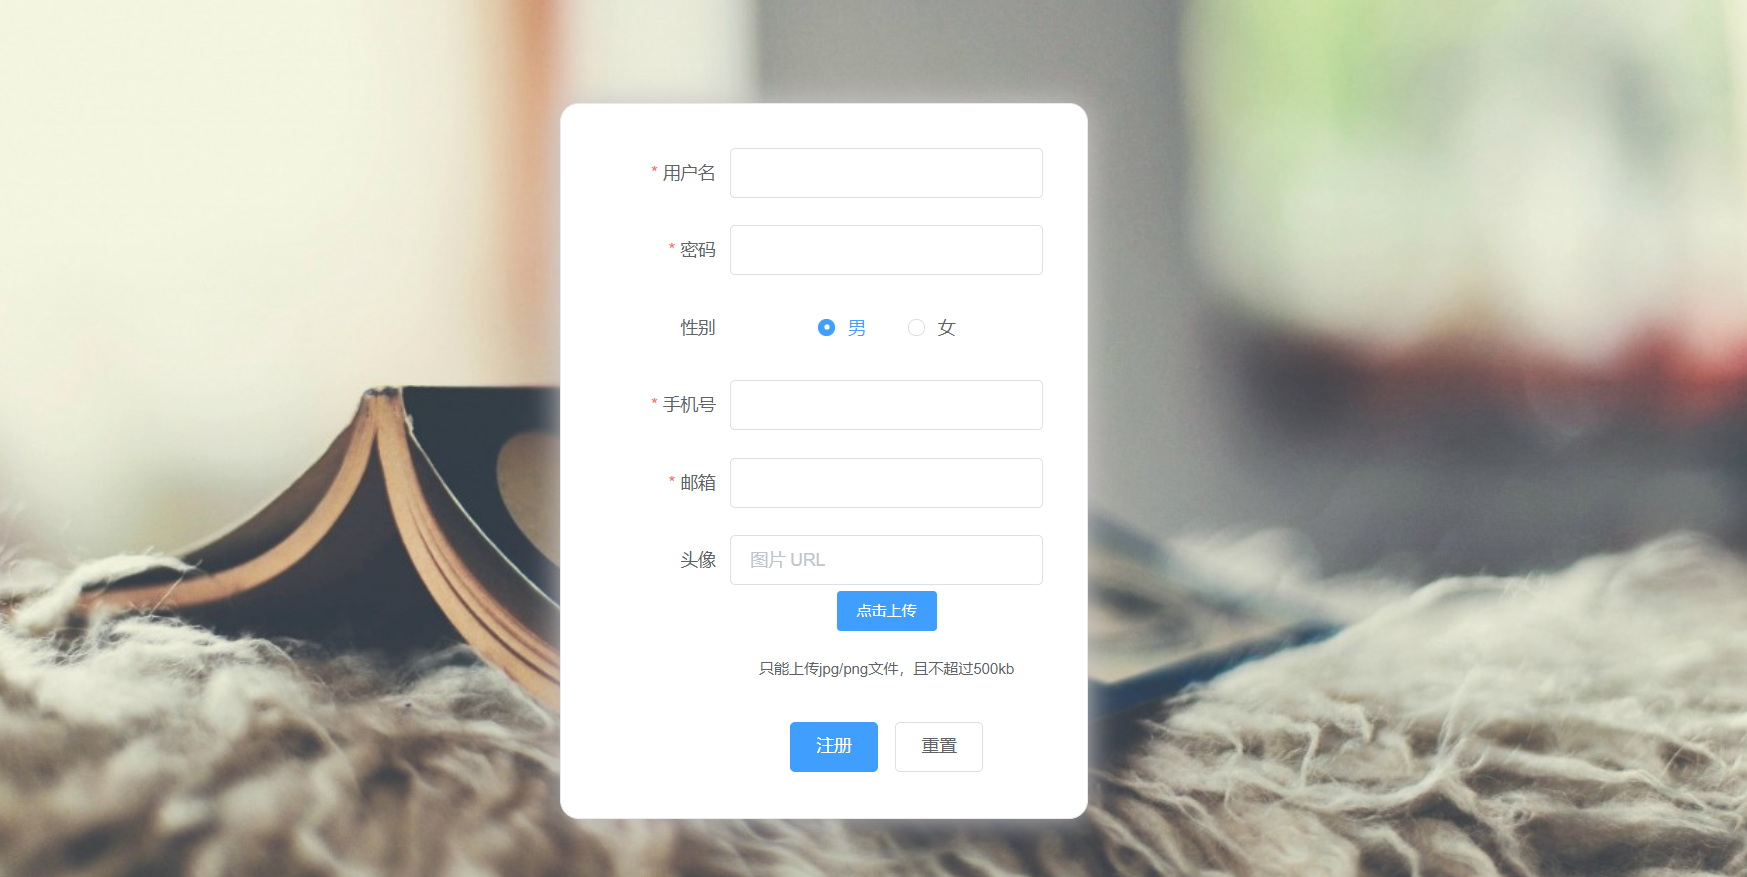
}成功截图
登录实现
登录逻辑
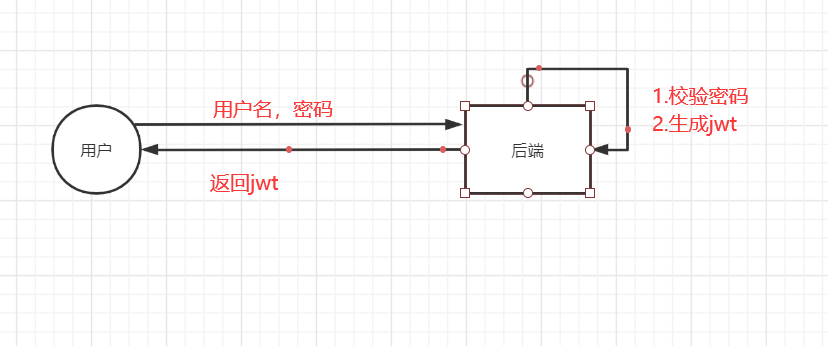
登录只需要接收账号密码,然后把用户的id生成jwt,返回给前端。
前端
在前面已经写好了Login.vue,现在截取部分说明一下
methods: {
      submitForm(formName) {
        this.$refs[formName].validate((valid) => {
          if (valid) {
            // 提交逻辑
            const _this = this
            this.$axios.post('/login', this.ruleForm).then((res)=>{
              console.log(res.headers)
              const jwt = res.headers['authorization']
              const userInfo = res.data.data //后端返回的对象信息
              //把数据放进store 全局共享
              _this.$store.commit("SET_TOKEN",jwt)
              _this.$store.commit("SET_USERINFO",userInfo)
              //登录成功后跳转
              _this.$router.push('/mall')
            })
          }
登录页面接收账号密码,通过/login请求带ruleForm对象传递给后端,获取返回消息,将jwt和用户消息存储到全局的store里,然后跳转主页。
先新建一个mall.vue页面并在router中注册
<template>
    <div>
      你好~~~~~~~~~欢迎来到商品代购平台
    </div>
</template>

<script>
    export default {
        name: "mall.vue"
    }
</script>

<style scoped>

</style>

-------------------------router中的index.js------------------------------------------------

import Mall from "../components/market/Mall";

{
    path: '/mall',
    name: 'mall',
    component: Mall
  }
后端
前端传递给后端的只有用户名和密码两个属性而已,如果用完整的User类来接收和查询数据库未免有些浪费资源和时间,这里可以封装一个dto对象,只保留要查询的属性,也可以接收前端传过来的额外字段(数据库中不存在,用于一些逻辑判断之类的)。
LoginDto
package com.zdx.entity.dto;

import lombok.Data;

import javax.validation.constraints.NotBlank;
import java.io.Serializable;

@Data
public class LoginDTO implements Serializable {

    @NotBlank(message = "昵称不能为空")
    private String username;

    @NotBlank(message = "密码 不能为空")
    private String password;
}
UserVO 这个类用来把部分数据封装传给前端
package com.zdx.entity.vo;

import com.fasterxml.jackson.annotation.JsonFormat;
import com.zdx.entity.User;
import lombok.Data;

import java.time.LocalDateTime;

@Data
public class UserVO {
    private Long id;
    private String username;
    private int sex;
    private String telephone;
    private String email;
    private String avatar;
    private float coin;
    @JsonFormat(pattern = "yyyy-MM-dd")
    private LocalDateTime createTime;
    @JsonFormat(pattern = "yyyy-MM-dd") //对日期格式化
    private LocalDateTime lastLogin;

    public UserVO(User user) {
        this.id = user.getId();
        this.username = user.getUsername();
        this.sex = user.getSex();
        this.telephone = user.getTelephone();
        this.email = user.getEmail();
        this.avatar = user.getAvatar();
        this.coin = user.getCoin();
        this.createTime = user.getCreateTime();
        this.lastLogin = user.getLastLogin();
    }
}
SystemController
@Autowired
JwtUtils jwtUtils;
//登录功能
@CrossOrigin
@PostMapping("/login")
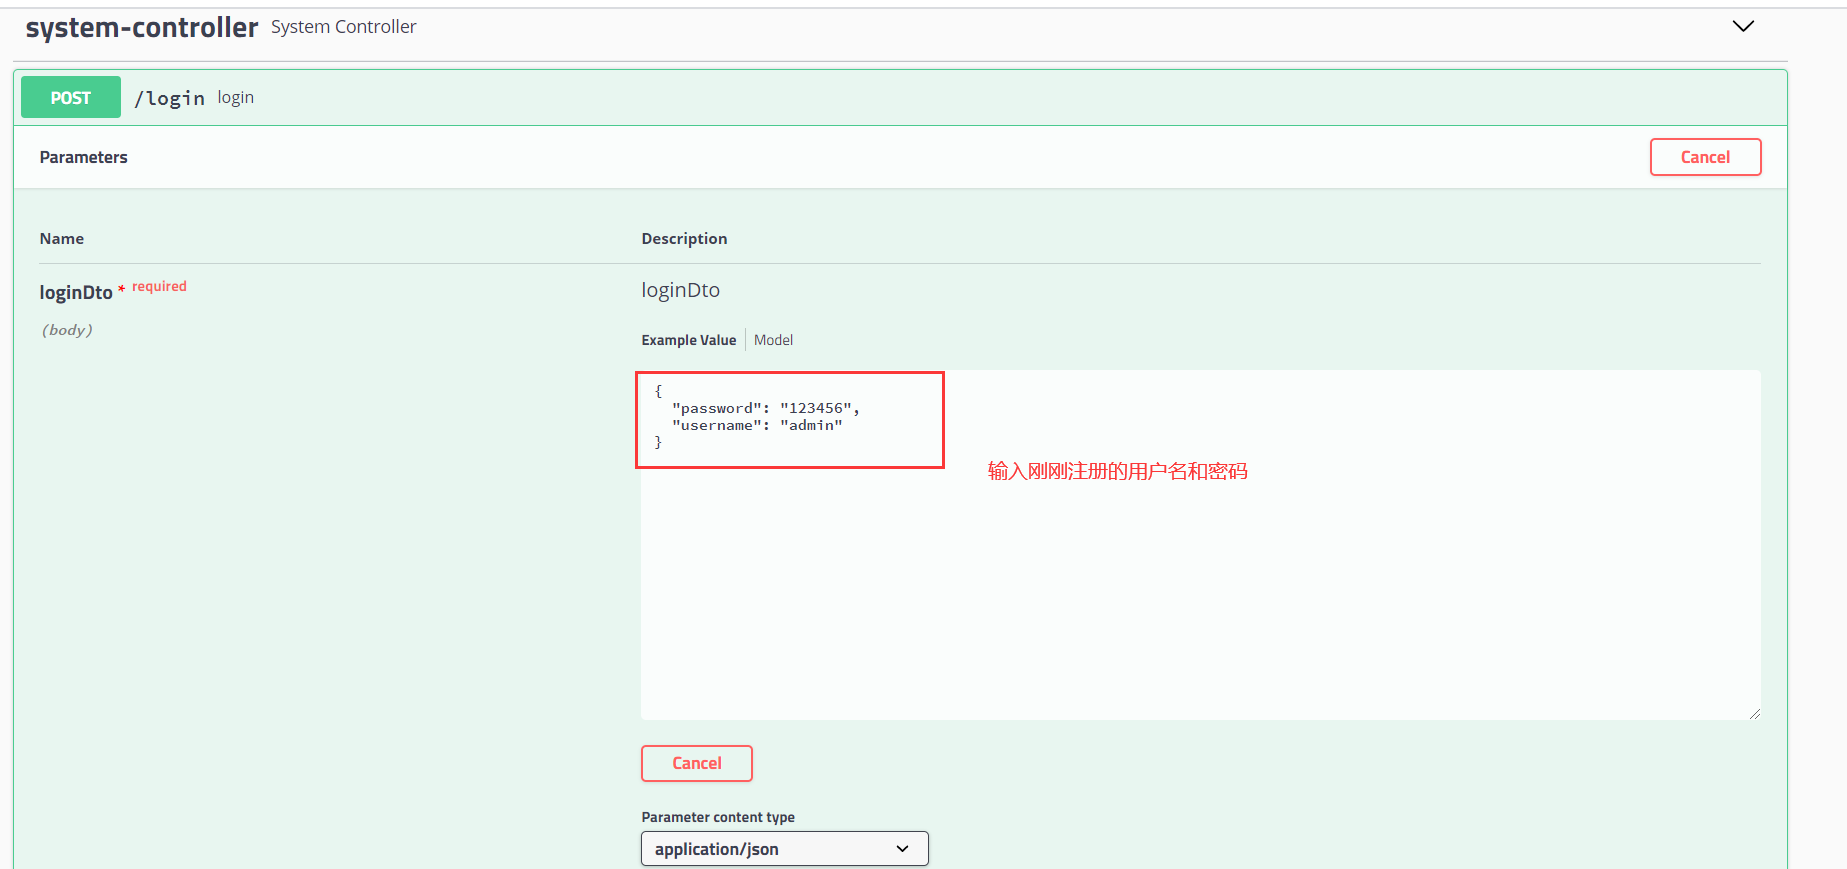
public Result login(@Validated @RequestBody LoginDTO loginDto, HttpServletResponse response){
String username = loginDto.getUsername();
username = HtmlUtils.htmlEscape(username); //防止xss攻击
loginDto.setUsername(username);
User user = userService.getOne(new QueryWrapper<User>().eq("username",loginDto.getUsername())); //根据用户名找
//用户不存在返回错误信息
if(user == null) {
return Result.fail("用户或密码不正确");
}
//判断密码是否正确 利用hutool工具先将密码加密再比较
if(!user.getPassword().equals(SecureUtil.md5(loginDto.getPassword()))){
return Result.fail("用户或密码不正确");
}
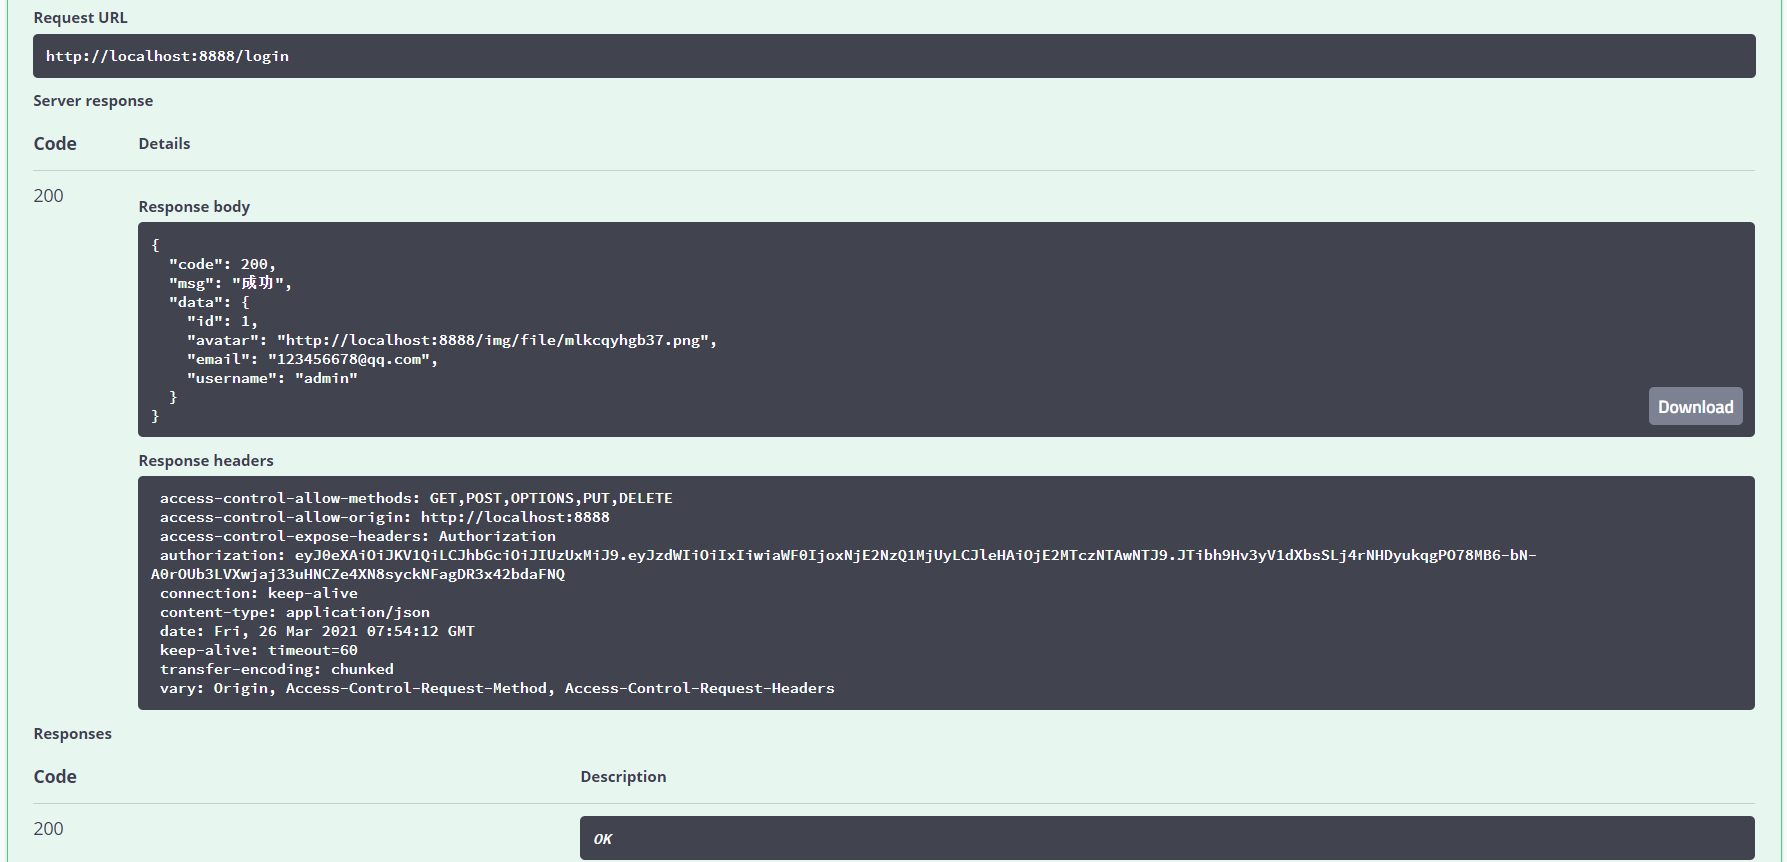
String jwt = jwtUtils.generateToken(user.getId()); //生成jwt
response.setHeader("Authorization",jwt); // 讲jwt放在header方便延期
response.setHeader("Access-Control-Expose-Headers", "Authorization");
user.setLastLogin(LocalDateTime.now());//更新上次登录的时间
userService.updateById(user);
//返回你想保存在前端Store中的用户信息
UserVO u = new UserVO(user); //返回最新的用户数据
return Result.success(u);
}通过Swagger2测试
顶部栏 NavMenu.vue
除去登录注册页面外,顶部栏应该一直存在用于显示我们的个人头像等信息,可以将其作为组件
首先创建父组件 Home.vue 并注册router
Home.vue
<template>
  <div>
    <router-view/>
  </div>
</template>

<script>
    export default {
        name: "Home.vue"
    }
</script>

<style scoped>

</style>

-----------------router index.js-------------------------
import Vue from 'vue'
import Router from 'vue-router'
import Login from "../components/Login";
import Register from "../components/Register";
import Mall from "../components/market/Mall";
import Home from "../components/Home";

Vue.use(Router)

const routes = [
  {
    path: '/',
    name: 'index',
    redirect: {name: 'Home'}
  },
  {
    path: '/login',
    name: 'login',
    component: Login
  },
  {
    path: '/register',
    name: 'register',
    component: Register
  },
  {
    path: '/home',
    name: 'Home',
    component: Home,
    // home页面不需要被访问
    redirect: '/mall',
    // 想要通过 <router-view/> 控制子组件的显示,则需要进行路由的相关配置。
    // 建立路由的父子关系
    children: [
      {
        path: '/mall',
        name: 'Mall',
        component: Mall
      }
    ]
  }
];
const router = new Router({
  mode: 'history',
  base: process.env.BASE_URL,
  routes
})
export default router
创建顶部栏
NavMenu.vue
<template>
  <div>
  <el-menu
    :default-active="'this.$route.path'"
    router
    mode="horizontal"
    background-color="white"
    text-color="#222"
    active-text-color="red"
    style="min-width: 1300px">
    <el-menu-item v-for="(item,i) in navList" :key="i" :index="item.name">
      {{ item.navItem }}
    </el-menu-item>
    <!--未登录则显示-->
    <el-link type="primary" v-show="!hasLogin" href="/login" style="float:right;font-size: 15px;padding: 20px" >{{user.username}}</el-link>
    <el-submenu index="2" style="float:right"  v-show="hasLogin" >
      <template #title >{{user.username}}</template>
      <el-menu-item index="2-1">个人信息</el-menu-item>
      <el-menu-item index="2-2">购物车</el-menu-item>
      <el-menu-item index="2-3" @click="logout()">退出</el-menu-item>
    </el-submenu>

    <el-avatar :size="50" :src="user.avatar" style="float:right;font-size: 40px;color: #222; margin: 5px auto;"></el-avatar>
    <span style="position: absolute;padding-top: 20px;right: 43%;font-size: 20px;font-weight: bold">欢迎来到商品代购平台!</span>
  </el-menu>
  </div>
</template>

<script>
  export default {
    name: 'NavMenu',
    data () {
      return {
        navList: [
          {name: '/mall', navItem: '首页'},
          {name: '/mall', navItem: '公告'},
        ],
        user: {
          username: '请先登录',
          avatar: "https://cube.elemecdn.com/3/7c/3ea6beec64369c2642b92c6726f1epng.png"
        },
        hasLogin: false //登录则为ture
      }
    },
    methods: {
      logout () {
      }
    },
    mounted() { //页面挂载完成后做一些ajax请求工作
      if(this.$store.getters.getUser.username){
        this.user.username = this.$store.getters.getUser.username
        this.user.avatar = this.$store.getters.getUser.avatar
        this.hasLogin = true
      }
    }
  }
</script>

<style scoped>
  a{
    text-decoration: none;
  }

  span {
    pointer-events: none;
  }
  .el-icon-switch-button {
    cursor: pointer;
    outline:0;
  }
</style>
顶部栏采用Element-ui的组件弄好了,下拉框的功能待会实现。现在要将组件加到父组件中。
Home.vue
<template>
  <div>
    <NavMenu></NavMenu>
    <router-view/>
  </div>
</template>

<script>
  import NavMenu from "./utils/NavMenu";
  export default {
    name: "Home.vue",
    components: {NavMenu}
  }
</script>

<style scoped>

</style>
大致就这样了

接下来就先从顶部栏开始,实现登出功能和个人信息功能吧。
登出
思路: 前端将全局store的token和用户信息清空,后端通过shiro调用SecurityUtils.getSubject().logout();
NavMenu.vue
在methods中添加logout方法
methods: {
  logout () {
    let _this = this
    _this.$axios.get("/logout",{
      headers: {
        "Authorization": localStorage.getItem("token")
      }
    }).then(res =>{
      _this.$store.commit("REMOVE_INFO") //退出清空store中的state的token和userInfo
      _this.$router.push("/mall") //去到首页

    })
  }
}
后端添加登出接口方法
//退出登录
@GetMapping("/logout")
public Result logout(){
SecurityUtils.getSubject().logout();
return Result.success(null);
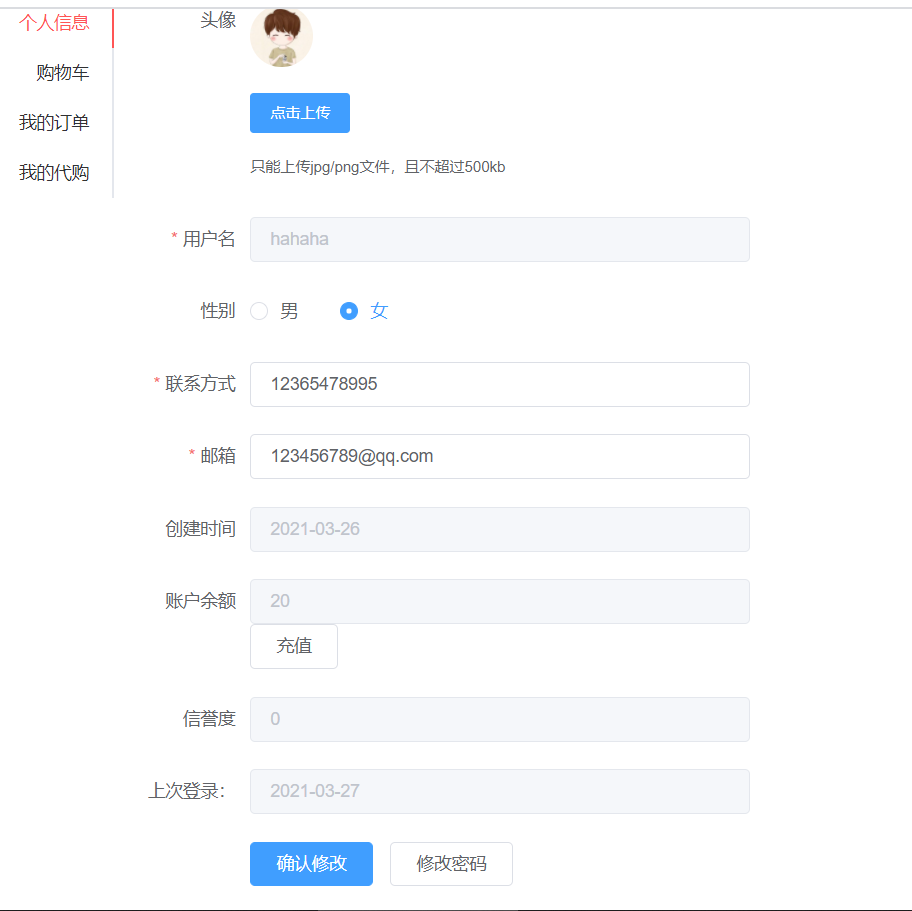
}个人信息功能
思路:
- 个人信息显示: 前端发送Get请求,后端返回用户信息回显。
- 修改头像: 将注册的组件拿过来用,重新发送post请求修改。
- 修改密码:比对密码正确性,然后发送post请求。
- 充值:同上
前端个人信息页面
个人信息页面我将采用Emelemt-ui的Tab标签,因此先创建UserMenu.vue。
UserMenu.vue
<template>
  <div class="profile">

    <el-tabs class="profile-tabs" tab-position="left">
      <el-tab-pane label="个人信息">
        <UserList></UserList>
      </el-tab-pane>
      <el-tab-pane label="购物车">

      </el-tab-pane>
      <el-tab-pane label="我的订单">

      </el-tab-pane>
      <el-tab-pane label="我的代购">

      </el-tab-pane>
    </el-tabs>

    <div @click="signOut">
      <el-tag style="float:right;user-select: none;cursor: pointer;" type="info">退出登陆</el-tag>
    </div>
  </div>
</template>

<script>
  import UserList from "./UserList";

  export default {

    name: "UserMenu",
    components: {UserList},

    data() {
      return {}
    },
    methods : {
      signOut(){
        console.log("我被点击了")
        this.$confirm('您确定要退出吗?').then(_ => {
          this.$store.commit('userSignOut')
          this.$router.push( { path : '/' })
        }).catch(_ => {})
      }
    }
  }
</script>

<style>
  .el-tabs__item.is-active{
    color: #ff5555;
  }
  .el-tabs__item:hover{
    color: #ff5555;
  }
  .el-tabs__active-bar{
    background-color:#ff5555;
  }
  .profile-tabs{

  }
</style>
接下来注册路由(截取部分)
import UserMenu from "../components/user/UserMenu";

-----------------

{
    path: '/home',
    name: 'Home',
    component: Home,
    // home页面不需要被访问
    redirect: '/mall',
    // 想要通过 <router-view/> 控制子组件的显示,则需要进行路由的相关配置。
    // 建立路由的父子关系
    children: [
      {
        path: '/mall',
        name: 'Mall',
        component: Mall
      },
      {
        path: '/userMenu',
        name: 'UserMenu',
        meta: {
          requireAuth: true  //带有meta:requireAuth: true说明是需要登录字后才能访问的受限资源
        },
        component: UserMenu
      }
    ]
  },
因为个人信息页面需要登录后才可以访问所有设置了权限,现在需要去src目录下创建全局权限处理permission.js
permission.js
import router from "./router";

// 路由判断登录 根据路由配置文件的参数
router.beforeEach((to, from, next) => {
  if (to.matched.some(record => record.meta.requireAuth)) { // 判断该路由是否需要登录权限
    const token = localStorage.getItem("token")
    console.log("------------" + token)
    if (token) { // 判断当前的token是否存在 ; 登录存入的token
      if (to.path === '/login') {
      } else {
        next()
      }
    } else {
      next({
        path: '/login'
      })
    }
  } else {
    next()
  }
})
需要在main.js里引入 import ‘./permission.js’ // 路由拦截
接下来 创建个人信息页面
UserList.vue
<template>
  <div class="personal-info">
    <el-form size="medium" :model="user" :rules="rules" ref="ruleForm" label-width="100px" class="demo-ruleForm">

      <el-form-item  label="头像" >
        <el-avatar :size="50" :src="user.avatar" style="font-size: 40px;color: #222; margin: 5px auto;"></el-avatar>
        <ImgUpLoad @onUpLoad="upLoadImg" ref="imgUpload"></ImgUpLoad>
      </el-form-item>

      <el-form-item label="用户名" prop="username">
        <el-input  v-model="user.username" :disabled="true" ></el-input>
      </el-form-item>

      <el-form-item  label="性别" prop="sex">
        <el-radio v-model="user.sex" label="1">男</el-radio>
        <el-radio v-model="user.sex" label="0">女</el-radio>
      </el-form-item>

      <el-form-item label="联系方式" prop="telephone">
        <el-input type="number" v-model="user.telephone"></el-input>
      </el-form-item>

      <el-form-item label="邮箱"  prop="email">
        <el-input v-model="user.email"></el-input>
      </el-form-item>

      <el-form-item label="创建时间">
        <el-input v-model="createTime" :disabled="true"></el-input>
      </el-form-item>

      <el-form-item label="账户余额">
        <el-input v-model="user.coin" :disabled="true"></el-input>
        <el-button @click="coinDialogVisible = true">充值</el-button>
      </el-form-item>

      <el-form-item label="信誉度">
        <el-input v-model="user.credit" :disabled="true"></el-input>
      </el-form-item>

      <el-form-item label="上次登录:">
        <el-input v-model="lastLogin" :disabled="true"></el-input>
      </el-form-item>

      <el-form-item>
        <el-button type="primary" @click="submitUserForm()">确认修改</el-button>
       <el-button @click="pwdDialogVisible = true">修改密码</el-button>
      </el-form-item>
    </el-form>


    <el-dialog
      title="账户充值"
      :visible.sync="coinDialogVisible"
      width="30%"
      :before-close="handleClose"
      center>
      <span><el-input v-model="charge" type="number" class="input-size"></el-input></span>
      <span slot="footer" class="dialog-footer">
        <el-button @click="coinDialogVisible = false">取 消</el-button>
        <el-button type="primary" @click="recharge()">确 定</el-button>
      </span>
    </el-dialog>

    <el-dialog
      title="修改密码"
      :visible.sync="pwdDialogVisible"
      width="30%"
      :before-close="handleClose"
      center>
      <el-form >
        <el-form-item label="原始密码" label-width="120px" >
          <el-input type="password" v-model="inputPwd" auto-complete="off" class="input-size"></el-input>
        </el-form-item>
        <el-form-item label="新密码" label-width="120px" >
          <el-input type="password" v-model="newPwd" auto-complete="off" class="input-size"></el-input>
        </el-form-item>
      </el-form>

      <span slot="footer" class="dialog-footer">
        <el-button @click="pwdDialogVisible = false">取 消</el-button>
        <el-button type="primary" @click="updatePwd">确 定</el-button>
      </span>
    </el-dialog>

  </div>
</template>

<script>
  import ImgUpLoad from "../utils/ImgUpLoad";
  export default {
    name: "UserList",
    components: {ImgUpLoad},
    data(){
      return {
        user: {
          id: this.$store.state.userInfo.id,
          username: this.$store.state.userInfo.username,
          password: '',
          sex: "1",
          telephone: this.$store.state.userInfo.telephone,
          email: this.$store.state.userInfo.email,
          avatar: this.$store.state.userInfo.avatar,
          coin: '',
          credit: '',
        },
        createTime: this.$store.state.userInfo.createTime,
        lastLogin: this.$store.state.userInfo.lastLogin,
        inputPwd: '',
        newPwd: '',
        charge : 0, //重置默认是0
        rules: {
          username: [
            { required: true, message: '请输入用户名', trigger: 'blur' },
            { min: 3, max:12, message: '长度在 3 到 12 个字符', trigger: 'blur' }
          ],
          telephone: [
            { required: true, message: '请输手机号', trigger: 'blur'},
            { min: 11, message: '请输入正确的手机号', trigger: 'blur' }
          ],
          email: [
            { required: true, message: '请输入邮箱', trigger: 'blur'}
          ]
        },
        coinDialogVisible: false, //关于是否显示充值
        pwdDialogVisible: false  //关于是否显示修改密码
      }
    },
    methods: {
      handleClose(done) {
        this.$confirm('确认关闭?')
          .then(_ => {
            done();
          })
          .catch(_ => {});
      },
      upLoadImg() {
        this.user.avatar = this.$refs.imgUpload.url
        this.$store.state.userInfo.avatar = this.$refs.imgUpload.url
      },
      //确认修改 则修改用户信息
      submitUserForm() {
        let _this = this
        _this.$axios.post("/user/updateUser",
          this.user,{
            headers: {
              "Authorization": localStorage.getItem("token") //要登录后才能改
            }
        }).then(res => {
          const uInfo = res.data.data //后端返回的对象信息有id,username,sex,avatar,email,createTime,lastlogin
          //跟新全局数据
          console.log("--====修改成功后==")
          console.log(res)
          _this.$store.commit("SET_USERINFO",uInfo)
          const h = _this.$createElement;
          _this.$notify({
            title: '修改成功',
            message: h('i', { style: 'color: teal'},  '信息已更新到数据库')
          })
        })
      },
      //修改密码
      updatePwd() {
        let _this = this
        _this.$axios.post("/user/updatePwd?id="+this.user.id+"&oldpd="+this.inputPwd+"&newpd="+this.newPwd,null,{
          headers: {
            "Authorization": localStorage.getItem("token") //要登录后才能改
          }
        }).then(res => {
          console.log("====修改密码")
          console.log(res)
          this.user.password = res.data.data //跟新密码
          alert('密码修改成功')
          _this.pwdDialogVisible = false //关闭窗口
        })
      },
      /* 充值 */
      recharge(){
        if (this.charge < 0){
          alert('请正确输入充值数')
        }else {
          //this.user.coin = parseInt(this.charge) + parseInt(this.user.coin)
          let _this = this
          _this.$axios.post("/user/updateCoin?coin="+this.charge+"&id="+this.user.id,null,{
            headers: {
              "Authorization": localStorage.getItem("token") //要登录后才能改
            }
          }).then(res => {
            this.$store.state.userInfo.coin = res.data.data
            this.user.coin = res.data.data
            alert('充值成功')
            this.coinDialogVisible = false
          })
        }
      },
    },


    //挂载后刷新数据
    mounted() {
      let _this = this
      if(_this.$store.state.userInfo.sex === 0){
          this.user.sex = "0"
      }
      _this.$axios.get("/user/userInfo/"+_this.$store.state.userInfo.id,{
        headers: {
          "Authorization": localStorage.getItem("token") //要登录后才能查
        }
      }).then(res => {
          console.log(res)
          this.user.password = res.data.data.password
          this.user.coin = res.data.data.coin
          this.user.credit = res.data.data.credit
      })
    }
  }
</script>

<style scoped>
  .personal-info{
    max-width: 500px;

    text-align: left;
  }
</style>
可以看到有好几个后端请求,所以现在就把后端完善。
后端
UserController
package com.zdx.controller;


import cn.hutool.core.map.MapUtil;
import cn.hutool.crypto.SecureUtil;
import com.zdx.common.Result;
import com.zdx.entity.User;
import com.zdx.entity.vo.UserVO;
import com.zdx.service.UserService;
import org.apache.shiro.authz.annotation.RequiresAuthentication;
import org.springframework.beans.factory.annotation.Autowired;
import org.springframework.validation.annotation.Validated;
import org.springframework.web.bind.annotation.*;

/**
 * <p>
 *  前端控制器
 * </p>
 *
 * @author 朱德鑫
 * @since 2021-03-25
 */
@RestController
@RequestMapping("/user")
public class UserController {

    @Autowired
    UserService userService;

    //获取用户信息
    @RequiresAuthentication //表示需要权限才能访问
    @GetMapping("/userInfo/{id}")
    public Result userInfo(@PathVariable(name = "id") Long id){
        User user = userService.getById(id);
        return Result.success(user);
    }

    //修改用户信息
    @RequiresAuthentication //表示需要权限才能访问
    @PostMapping("/updateUser")
    public Result updateUser(@Validated @RequestBody User user){
        Long id = user.getId();
        userService.updateById(user);
        UserVO u =  new UserVO(userService.getById(id)); //返回最新的用户数据
        return Result.success(u);
    }

    //修改密码
    @RequiresAuthentication //表示需要权限才能访问
    @PostMapping("/updatePwd")
    public Result updatePwd(@RequestParam("id") Long id,
                            @RequestParam("oldpd") String oldpd,
                            @RequestParam("newpd") String newpd){
        User user = userService.getById(id);
        String old = SecureUtil.md5(oldpd);
        String password = SecureUtil.md5(newpd);
        if(user == null){
            return Result.fail("用户不存在");
        }else if (!old.equals(user.getPassword())){
            return Result.fail("密码错误");
        }else if (password.equals(user.getPassword())){
            return Result.fail("新密码与旧密码相同");
        }
        user.setPassword(password);
        userService.updateById(user);
        return Result.success(password);
    }

    //充值
    @RequiresAuthentication //表示需要权限才能访问
    @PostMapping("/updateCoin")
    public Result updateCoin(@RequestParam("coin") float coin,
                             @RequestParam("id") long id){
        if(coin <= 0){
            return Result.fail("请输入大于0的数");
        }
        User user = userService.getById(id);
        if(user == null){
            return Result.fail("用户不存在");
        }
        float newCoin = coin + user.getCoin();
        user.setCoin(newCoin);
        userService.updateById(user);
        return Result.success(newCoin);
    }
}
成果图
发布代购
思路:其实和注册用户的功能实现是差不多一样的。
前端
新建一个添加商品页面作为home的子组件,记得在路由中添加哦。注意在挂载这个页面后需要像后端发送请求获取分类信息。
GoodsEdit
<template>
  <div class="goods-add-form">

    <el-form :model="goods" :rules="rules" ref="goodsName" label-width="100px" class="demo-ruleForm" style="margin-top: 50px;">

      <el-form-item label="商品名称" prop="name">
        <el-input v-model="goods.name"></el-input>
      </el-form-item>

      <el-form-item label="商品价格" prop="price">
        <el-input type="number" v-model="goods.price"></el-input>
      </el-form-item>

      <el-form-item label="代购数量" >
        <el-input type="number" v-model="goods.number"></el-input>
      </el-form-item>


      <el-form-item label="商品类型" prop="type">
        <el-select v-model="goods.cid" placeholder="请选择">
          <el-option
            v-for="item in category"
            :key="item.id"
            :label="item.name"
            :value="item.id">
          </el-option>
        </el-select>
      </el-form-item>

      <el-form-item label="货源产地" prop="area" placeholder="请尽可能的描述此商品所在的具体位置" >
        <el-input  v-model="goods.area"></el-input>
      </el-form-item>

      <el-form-item  label="商品图片" >
        <el-input v-model="goods.img" autocomplete="off" placeholder="图片 URL"></el-input>
        <ImgUpLoad @onUpLoad="upLoadImg" ref="imgUpload"></ImgUpLoad>
      </el-form-item>

      <el-form-item label="商品描述" prop="description" placeholder="描述的更详细更吸引人哦!">
        <el-input type="textarea" v-model="goods.description"></el-input>
      </el-form-item>

      <el-form-item>
        <el-button type="primary" @click="submitGoodsForm()" >发布</el-button>
        <el-button @click="resetForm('goodsName')">重置</el-button>
      </el-form-item>
    </el-form>

  </div>
</template>

<script>
  import ImgUpLoad from "../utils/ImgUpLoad";
  export default {
    name: "GoodEdit",
    components: {ImgUpLoad},
    data() {
      return {
        category: [],
        goods: {
          name: '',
          price: '',
          number: 1,
          area: '',
          cid: '',
          description: '',
          img: '',
          uid: ''
        },
        rules: {
          name: [
            {required: true, message: '请输入商品名称',trigger: 'blur'},
          ],
          price: [
            { required: true, message: '请输入价格',trigger: 'blur'}
          ],
          area: [
            {required: true, message: '请选择下架日期', trigger: 'blur'}
          ],
          category: [
            {type: 'string', required: true, message: '请选择一个类型', trigger: 'change'}
          ],
          description: [
            {type: 'string', required: true, message: '请描述商品信息', trigger: 'blur'}
          ],

        }
      }
    },
    //提前做些操作
    mounted() {
      let _this = this
      _this.$axios.get("/category/find").then(res => {
        this.category = res.data.data
        console.log(this.category)
      })
    },


    methods: {
      resetForm(goodsName) {
        this.$refs[goodsName].resetFields();
      },
      //提交信息
      submitGoodsForm(){
        console.log("===点击提交")
        console.log(this.goods)
        //判断输入的商品数量和价格是否合法
        if (this.goods.number <= 0 || this.goods.price <= 0){
          const h = this.$createElement;
          this.$notify({
            title: '输入错误',
            message: h('i', { style: 'color: teal'},  '价格或者数量输入不合法!~~~')
          })
        }else {
          let _this = this
          this.$axios.post("/goods/edit",_this.goods,{
            headers: {
              "Authorization": localStorage.getItem("token") //要登录后才能改
            }
          }).then(res => {
            _this.$router.push("/mall")
            const h = _this.$createElement;
            _this.$notify({
              title: '成功',
              message: h('i', { style: 'color: teal'},  '商品发布成功')
            })
          })
        }
      },

      upLoadImg() {
        this.goods.img = this.$refs.imgUpload.url
      }
    }
  }
</script>

<style scoped>
  .goods-add-form{
    margin: auto;
    max-width: 700px;
    text-align: left;
  }
</style>
前端其实一个页面就搞定了,接下来实现后端功能
后端
后端的功能主要有,首先获取分类信息传递给前端,发布商品信息。
CategoryController
package com.zdx.controller;


import com.zdx.common.Result;
import com.zdx.entity.Category;
import com.zdx.service.CategoryService;
import org.springframework.beans.factory.annotation.Autowired;
import org.springframework.web.bind.annotation.GetMapping;
import org.springframework.web.bind.annotation.RequestMapping;

import org.springframework.web.bind.annotation.RestController;

import java.util.List;

/**
 * <p>
 *  前端控制器
 * </p>
 *
 * @author 朱德鑫
 * @since 2021-03-25
 */
@RestController
@RequestMapping("/category")
public class CategoryController {

    @Autowired
    CategoryService categoryService;

    @GetMapping("/find")
    public Result find(){
        List<Category> categories = categoryService.list();
        return Result.success(categories);
    }
}
GoodsController
package com.zdx.controller;


import cn.hutool.core.lang.Assert;
import com.zdx.common.Result;
import com.zdx.entity.Goods;
import com.zdx.service.GoodsService;
import com.zdx.util.ShiroUtil;
import org.apache.shiro.authz.annotation.RequiresAuthentication;
import org.springframework.beans.factory.annotation.Autowired;
import org.springframework.validation.annotation.Validated;
import org.springframework.web.bind.annotation.PostMapping;
import org.springframework.web.bind.annotation.RequestBody;
import org.springframework.web.bind.annotation.RequestMapping;

import org.springframework.web.bind.annotation.RestController;

/**
 * <p>
 *  前端控制器
 * </p>
 *
 * @author 朱德鑫
 * @since 2021-03-25
 */
@RestController
@RequestMapping("/goods")
public class GoodsController {

    @Autowired
    GoodsService goodsService;

    @RequiresAuthentication
    @PostMapping("/edit")
    public Result goodsEdit(@Validated @RequestBody Goods goods){
        if(goods.getPrice() <=0 || goods.getNumber() <= 0){
            return Result.fail("输入的数量或价格不合法");
        }
        Goods g = null;
        if(goods.getId() != null){ //不为空说明是编辑
            g = goodsService.getById(goods.getId());
            //判断是否是自己的商品
            Assert.isTrue(g.getUid().longValue() == ShiroUtil.getProfile().getId().longValue(),"没有权限编辑");
            goodsService.updateById(goods);
        }else {
            //增加操作
            goods.setUid(ShiroUtil.getProfile().getId());
            goodsService.saveOrUpdate(goods);
        }
        return Result.success(null);
    }
}
商品页面
这个功能比较有难度 前端应该左右布局,左边是分类信息右边是商品展示。
首先创建左边分类栏’SideMenu’
SideMenu
<template>
<div>
    <el-menu
      class="categories"
      default-active="0"
      @select="handleSelect"
      active-text-color="red"
     >
      <el-menu-item index="0"   >
        <i class="el-icon-menu" ></i>
        <span slot="title">全部</span>
      </el-menu-item>

      <div  v-for="item in category" :key="item.id">
      <el-menu-item :index="item.id" >
        <i class="el-icon-menu"></i>
        <span slot="title">{{item.name}}</span>
      </el-menu-item>
      </div>
    </el-menu>

</div>
</template>

<script>
  export default {
    name: 'SideMenu',
    data () {
      return {
        cid: '0',
        category: [],
      }
    },
    methods: {
      handleSelect (key) {
        console.log("=======当前的cid为")
        console.log(key)
        this.cid = key
        this.$emit('indexSelect')
      }
    },
    //提前做些操作
    mounted() {
      let _this = this
      _this.$axios.get("/category/find").then(res => {
        this.category = res.data.data
      })
    }
  }
</script>

<style scoped>
  .categories {
    max-width: 200px;
    margin: 0 50px;
    text-align: left;
  }
</style>
Mall.vue
<template>
    <el-container>
      <el-aside style="margin-top: 20px">
      <SideMenu @indexSelect="listByCategory" ref="sideMenu"></SideMenu>
      </el-aside>
      <el-main>
      <Goods ref="goodsShow"></Goods>
      </el-main>
    </el-container>
</template>

<script>
  import SideMenu from "./SideMenu";
  import Goods from "./Goods";
    export default {
      name: "Mall",
      components: {SideMenu,Goods},
      methods: {
        listByCategory(){
          let _this = this
          let cid = this.$refs.sideMenu.cid
          _this.$refs.goodsShow.cid = cid
          _this.$refs.goodsShow.currentPage = 1
          _this.$refs.goodsShow.page() //每次选择一个类别都要执行一次子组件的商品查询展示
        }
      }
    }
</script>

<style scoped>

</style>
Goods.vue
<template>
  <div>
    <el-row style="height: 900px;" >

      <SearchBar @onSearch="searchResult" ref="searchbar"></SearchBar>
      <el-tooltip effect="dark" placement="right"
                  v-for="goods in goodsList.slice((currentPage-1)*pageSize,currentPage*pageSize)"
                  :key="goods.id">
        <p slot="content" style="font-size: 14px;margin-bottom: 6px;">{{goods.name}}</p>

        <p slot="content" style="width: 300px" class="abstract">{{goods.description}}</p>
        <el-card style="width: 200px;margin-bottom: 20px;height: 250px;float: left;margin-right: 15px"
                 bodyStyle="padding:0px" s shadow="hover">
          <div class="cover">
            <img :src="goods.img" alt="商品">
          </div>


            <div class="author">
              <a>{{goods.name}}</a>
            </div>

          <div class="bottom">
            <div class="time">
            {{goods.area}}
            </div>
            <el-button type="text" class="button">{{goods.price}}元</el-button>
          </div>
        </el-card>
      </el-tooltip>
    </el-row>

    <el-row>
      <el-pagination
        background
        layout="prev, pager, next"
        :page-size="this.pageSize"
        :current-page="this.currentPage"
        :total="goodsList.length"
        @current-change=pageChange
        class="pagin" >
      </el-pagination>
    </el-row>

  </div>
</template>

<script>
  import SearchBar from "../utils/SearchBar";
    export default {
      name: "Goods",
      components: {SearchBar},
      data() {
        return {
          cid: '0',
          goodsList: {},
          currentPage: 1,
          pageSize: 15
        }
      },
      methods: {
        page() {
          const _this = this
          _this.$axios.get("/goods/findByCid?cid="+_this.cid).then(res => {
            console.log("==这里是商品展示===")
            console.log(res)
            _this.goodsList = res.data.data
            _this.currentPage = 1
          })
        },
        pageChange(currentPage) {
          const _this = this
          _this.currentPage = currentPage
        },
        //搜索功能 子组件唤醒
        searchResult () {
          let _this = this
          this.$axios
            .get('/goods/search?keywords=' + this.$refs.searchbar.keywords).then(res => {
              console.log(res)
              _this.goodsList = res.data.data
              _this.currentPage = 1
              _this.$refs.searchbar.keywords = ''
          })
        }
      },
      mounted() {
        this.page()
      }
    }
</script>

<style scoped>


  .pagin{
    margin: 0 auto;
    text-align: center;
  }

  .cover {
    width: 100%;
    height: 172px;
    margin-bottom: 7px;
    overflow: hidden;
    cursor: pointer;
  }

  img {
    width: 100%;
    height: 172px;
  }


  .time {
    font-size: 13px;
    color: #999;
  }

  .author {
    color: #333;
    width: 100%;
    margin: 20px 0;
    font-size: 13px;
    margin-bottom: 6px;
    text-align: left;
  }

  .abstract {
    display: block;
    line-height: 17px;
  }
  .bottom {
    line-height: 12px;
    display: flex;
    justify-content: space-between;
    align-items: center;
  }
  .button {
    padding: 0;
    float: right;
    color: red;
  }
</style>
分页是在前端实现的,后端返回总的数据,好处是当数据量小的时候不需要每次翻页都要发送请求。但是当数据量大的时候,应该由后端返回一页一页的数据。
后端
GoodsController
package com.zdx.controller;


import cn.hutool.core.lang.Assert;
import com.baomidou.mybatisplus.core.conditions.query.QueryWrapper;
import com.baomidou.mybatisplus.core.metadata.IPage;
import com.baomidou.mybatisplus.extension.plugins.pagination.Page;
import com.sun.org.apache.xerces.internal.util.EntityResolverWrapper;
import com.zdx.common.Result;
import com.zdx.entity.Goods;
import com.zdx.service.GoodsService;
import com.zdx.util.ShiroUtil;
import org.apache.shiro.authz.annotation.RequiresAuthentication;
import org.springframework.beans.factory.annotation.Autowired;
import org.springframework.validation.annotation.Validated;
import org.springframework.web.bind.annotation.*;

import java.util.List;

/**
 * <p>
 *  前端控制器
 * </p>
 *
 * @author 朱德鑫
 * @since 2021-03-25
 */
@RestController
@RequestMapping("/goods")
public class GoodsController {

    @Autowired
    GoodsService goodsService;

    //商品编辑
    @RequiresAuthentication
    @PostMapping("/edit")
    public Result goodsEdit(@Validated @RequestBody Goods goods){
        if(goods.getPrice() <=0 || goods.getNumber() <= 0){
            return Result.fail("输入的数量或价格不合法");
        }
        Goods g ;
        if(goods.getId() != null){ //不为空说明是编辑
            g = goodsService.getById(goods.getId());
            //判断是否是自己的商品
            Assert.isTrue(g.getUid().longValue() == ShiroUtil.getProfile().getId().longValue(),"没有权限编辑");
            goodsService.updateById(goods);
        }else {
            //增加操作
            goods.setUid(ShiroUtil.getProfile().getId());
            goodsService.saveOrUpdate(goods);
        }
        return Result.success(null);
    }

    //商品查询
    @GetMapping("/goods/find")
    public Result find(){

        return Result.success(goodsService.list());
    }

    //商品展示
    @GetMapping("/findByCid")
    public Result list(@RequestParam("cid") Long cid){

        if(cid < 1){
            return find(); //查询所有商品
        }
        List<Goods> goodsList = goodsService.list(new QueryWrapper<Goods>().eq("cid",cid));
        return Result.success(goodsList);
    }

    //关键字查询
    @GetMapping("/search")
    public Result search(@RequestParam("keywords") String keywords){
        // 关键词为空时查询出所有商品
        if ("".equals(keywords)) {
            return find();
        } else { //模糊查询
            List<Goods> goodsList = goodsService.list(new QueryWrapper<Goods>().like("name",keywords)
                                                                                .or().like("description",keywords));
            return Result.success(goodsList);
        }
    }
}
效果大致如下:
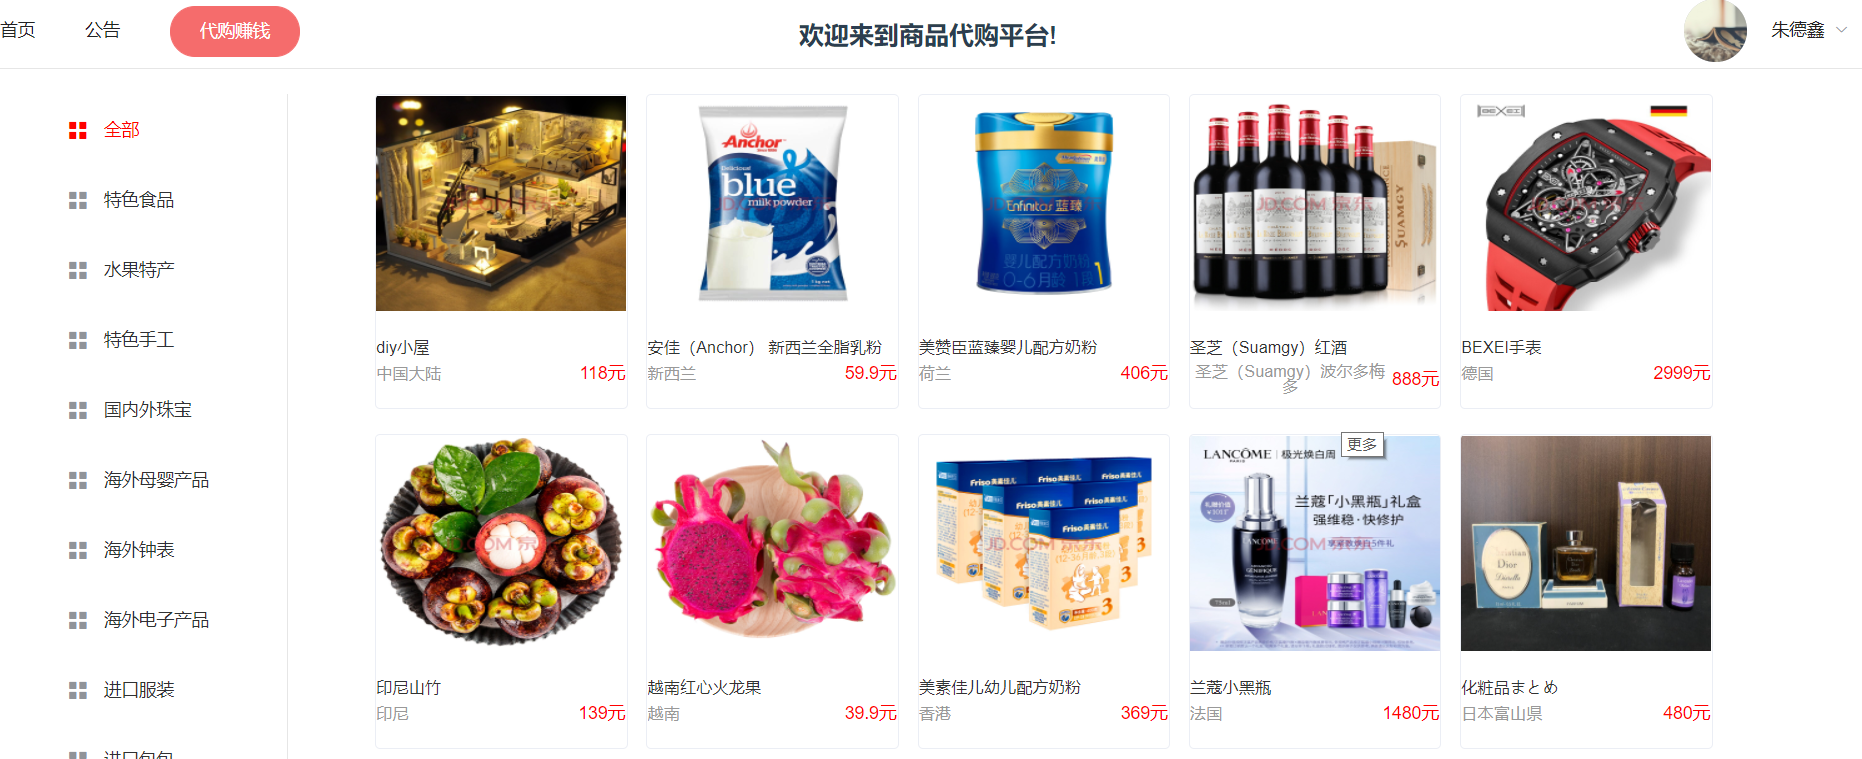
搜索框
我将搜索框单独作为一个子组件然后在商品展示页面集成。在搜索框中输入的内容将传递给父组件中,在父组件触发查询的请求。
SearchBar
<template>
  <div style="margin-bottom: 30px;display: flex;justify-content: center;align-items: center">
    <el-input
      @keyup.enter.native="searchClick"
      placeholder="通过商品名或描述搜索..."
      prefix-icon="el-icon-search"
      size="small"
      style="width: 400px;margin-right: 10px"
      v-model="keywords">
    </el-input>
    <el-button size="small" type="primary" icon="el-icon-search" @click="searchClick">搜索</el-button>
  </div>
</template>

<script>
  export default {
    name: 'SearchBar',
    data () {
      return {
        keywords: '',
        books: [],
      }
    },
    methods: {
      searchClick () {
        this.$emit('onSearch')
      }
    }
  }
</script>

<style scoped>

</style>
Goods.vue 和 后端都在上面中写好了。
我的代购
通过表格将本id的代购商品查询出来,进行编辑或者下架操作。
前端
新建一个UserMenu的子组件用于展示代购信息
MyGoods
<template>
  <el-table
    :data="goodsList"
    style="width: 100%">
    <el-table-column
      label="日期"
      width="180">
      <template #default="scope">
        <i class="el-icon-time"></i>
        <span style="margin-left: 10px">{{ scope.row.createTime }}</span>
      </template>
    </el-table-column>

    <el-table-column
      label="商品名称"
      width="200">
      <template #default="scope">
        <el-popover effect="light" trigger="hover" placement="top">
          <template #default>
            <p>销售地区: {{ scope.row.area }}</p>
            <p>商品信息: {{ scope.row.description }}</p>
          </template>
          <template #reference>
            <div class="name-wrapper">
              <el-tag size="medium">{{ scope.row.name }}</el-tag>
            </div>
          </template>
        </el-popover>
      </template>
    </el-table-column>

    <el-table-column
      label="图片"
      width="180">
      <template #default="scope">
        <div class="tupian" >
          <img :src="scope.row.img" >
        </div>
      </template>
    </el-table-column>

    <el-table-column
      label="单价"
      width="180">
      <template #default="scope">
        <span style="margin-left: 10px">{{ scope.row.price }}</span>
      </template>
    </el-table-column>

    <el-table-column
      label="剩余数量"
      width="180">
      <template #default="scope">
        <span style="margin-left: 10px">{{ scope.row.number }}</span>
      </template>
    </el-table-column>


    <el-table-column label="操作">
      <template #default="scope">
        <el-button size="mini">
          <router-link :to="{name: 'GoodsEdit',params: {goodsId: scope.row.id}}">
            编辑
          </router-link>
        </el-button>
        <el-button
          size="mini"
          type="danger"
          @click="handleDelete(scope.$index, scope.row)">下架</el-button>
      </template>
    </el-table-column>
  </el-table>
</template>

<script>
    export default {
        name: "MyGoods",
      data() {
        return {
          goodsList: []
        }
      },
      //挂载页面先查数据
      mounted() {
        let _this = this
        let uid = _this.$store.state.userInfo.id //当前用户的id
        _this.$axios.get("/goods/findByUId?id="+uid,{
          headers: {
            "Authorization": localStorage.getItem("token") //要登录后才能查
          }
        }).then(res => {
          _this.goodsList = res.data.data
        })
      },
      methods: {
        handleDelete(index, row) {
          //删除操作
          this.$confirm('此操作将永久删除该商品, 是否继续?', '提示', {
            confirmButtonText: '确定',
            cancelButtonText: '取消',
            type: 'warning'
          }).then(() => {
            //执行删除
            let _this = this
            _this.$axios.delete("/goods/deleteById?id="+row.id,{
              headers: {
                "Authorization": localStorage.getItem("token") //要登录
              }
            })
            this.$message({
              type: 'success',
              message: '删除成功!'
            });
            location.reload()
          }).catch(() => {
            this.$message({
              type: 'info',
              message: '已取消删除'
            });
          });
        }
      }
    }
</script>

<style scoped>
  .tupian{ border:1px solid #000; width:300px; height:100px}
  .tupian img{width:300px; height:100px}
</style>
记得添加到UserMenu组件
UserMenu 片段
</el-tab-pane>
  <el-tab-pane label="我的代购">
  <MyGoods></MyGoods>
</el-tab-pane>

----------------------------------
import MyGoods from "./MyGoods";

  export default {

    name: "UserMenu",
    components: {UserList,MyGoods},
后端
页面挂载时会有个请求获取所有的当前用户的商品,删除时根据前端传递进来的id删除。
GoodsController
//根据用户id查询该用户所属的的商品
   @RequiresAuthentication
   @GetMapping("/findByUId")
   public Result findByUId(@RequestParam("id") Long id){
       List<Goods> goodsList = goodsService.list(new QueryWrapper<Goods>().eq("uid",id));
       return Result.success(goodsList);
   }

   //删除
   @RequiresAuthentication
   @DeleteMapping("/deleteById")
   public Result deleteById(@RequestParam("id") Long id){
       //首先判断该id还存不存在
       Goods goods = goodsService.getById(id);
       if(goods == null){
           return Result.fail("该商品已下架~~");
       }
       goodsService.removeById(id);
       return Result.success(null);
   }
注意 之前已经介绍过了,这两个操作都需要进行身份验证。
我的代购页面
购物车
现在实现购物车功能,思路就是 点击加入购物车,把商品id和用户id传递给后端保存到数据库中。
前端
GoodsDetail 添加购物车方法 跟我的代购是一样的实现方式
//加入购物车 首先判断是否是自己的商品
      addToCart(){
        let _this = this
        if(_this.$store.state.userInfo.id === _this.goods.uid){
          const h = _this.$createElement;
          _this.$notify({
            message: h('i', { style: 'color: red'}, '不能购买自己的商品!!')
          });
        }else {
          let uid = _this.$store.state.userInfo.id
          let gid = _this.goods.id
          _this.$axios.post("/cart/addCart?uid="+uid+"&gid="+gid,null,{
            headers: {
              "Authorization": localStorage.getItem("token") //要登录
            }
          }).then(res => {
            const h = _this.$createElement;
            _this.$notify({
              message: h('i', { style: 'color: blue'}, '购物车添加成功!')
            });
          })
        }
      }
我的购物车
GoodsCart
<template>
  <el-table
    :data="goodsList"
    style="width: 100%">

    <el-table-column
      label="商品名称"
      width="200">
      <template #default="scope">
        <span style="margin-left: 10px">{{ scope.row.name }}</span>
      </template>
    </el-table-column>

    <el-table-column
      label="图片"
      width="180">
      <template #default="scope">
        <div class="tupian" >
          <img :src="scope.row.img" >
        </div>
      </template>
    </el-table-column>

    <el-table-column
      label="单价"
      width="180">
      <template #default="scope">
        <span style="margin-left: 10px">{{ scope.row.price }}</span>
      </template>
    </el-table-column>

    <el-table-column
      label="剩余数量"
      width="180">
      <template #default="scope">
        <span style="margin-left: 10px">{{ scope.row.number }}</span>
      </template>
    </el-table-column>


    <el-table-column label="操作">
      <template #default="scope">
        <el-button size="mini">
          <router-link :to="{name: 'GoodsEdit',params: {goodsId: scope.row.id}}">
            下单
          </router-link>
        </el-button>
        <el-button
          size="mini"
          type="danger"
          @click="handleDelete(scope.$index, scope.row)">取消</el-button>
      </template>
    </el-table-column>
  </el-table>
</template>

<script>
  export default {
    name: "GoodsCart",
    data() {
      return {
        goodsList: []
      }
    },
    mounted() {
      this.initGoodsCart()
    },
    methods: {
      initGoodsCart(){
        let _this = this
        let uid = _this.$store.state.userInfo.id //当前用户的id
        _this.$axios.get("/cart/getCartByUId?uid="+uid,{
          headers: {
            "Authorization": localStorage.getItem("token") //要登录后才能查
          }
        }).then(res => {
          _this.goodsList = res.data.data
          console.log("=====购物车加载数据。。。")
          console.log(_this.goodsList)
        })
      },
      handleDelete(index, row) {
        //取消收藏
        this.$confirm('此操作将永久取消该收藏, 是否继续?', '提示', {
          confirmButtonText: '确定',
          cancelButtonText: '取消',
          type: 'warning'
        }).then(() => {
          //执行删除
          let _this = this
          _this.$axios.delete("/cart/deleteById?id="+row.id,{
            headers: {
              "Authorization": localStorage.getItem("token") //要登录
            }
          }).then(res => {
            _this.initGoodsCart()
          })
          this.$message({
            type: 'success',
            message: '取消成功!'
          });
        }).catch(() => {
          this.$message({
            type: 'info',
            message: '已撤销操作'
          });
        });
      }
    }
  }
</script>

<style scoped>
  .tupian{ border:1px solid #000; width:300px; height:100px}
  .tupian img{width:300px; height:100px}
</style>
后端
CartController
package com.zdx.controller;


import com.baomidou.mybatisplus.core.conditions.query.QueryWrapper;
import com.zdx.common.Result;
import com.zdx.entity.Cart;
import com.zdx.entity.Goods;
import com.zdx.service.CartService;
import com.zdx.service.GoodsService;
import org.apache.shiro.authz.annotation.RequiresAuthentication;
import org.springframework.beans.factory.annotation.Autowired;
import org.springframework.validation.annotation.Validated;
import org.springframework.web.bind.annotation.*;

import java.util.ArrayList;
import java.util.List;

/**
 * <p>
 *  购物车
 * </p>
 *
 * @author 朱德鑫
 * @since 2021-03-25
 */
@RestController
@RequestMapping("/cart")
public class CartController {

    @Autowired
    CartService cartService;
    @Autowired
    GoodsService  goodsService;


    @RequiresAuthentication
    @PostMapping("/addCart")
    public Result addCart(@RequestParam("uid") Long uid,
                          @RequestParam("gid") Long gid){
        Cart cart = new Cart();
        cart.setUid(uid);
        cart.setGid(gid);
        cartService.save(cart);
        return Result.success("添加购物车成功");
    }

    //根据id查询购物车
    @RequiresAuthentication
    @GetMapping("/getCartByUId")
    public Result getCartByUId(@RequestParam("uid") Long uid){
        //根据uid找到所有的订单
        List<Cart> cartList = cartService.list(new QueryWrapper<Cart>().eq("uid",uid));
        List<Goods> goodsList = new ArrayList<Goods>();
        //根据找到的订单信息中的gid 返回一个商品列表
        for(Cart i : cartList){
            //判断这个商品是否已下架
            Goods goods = goodsService.getById(i.getGid());
            if(goods == null){
                return Result.fail("该商品已下架~~~~");
            }
            goodsList.add(goods);
        }
        return Result.success(goodsList);
    }

    //删除
    @RequiresAuthentication
    @DeleteMapping("/deleteById")
    public Result deleteById(@RequestParam("id") Long id){
        cartService.remove(new QueryWrapper<Cart>().eq("gid",id));
        return Result.success(null);
    }

}
下单购买
购买逻辑比较杂乱,既要计算商品数量还有用户余额 ,商品删除时还要去除购物车中的信息。
前端
GOodsBuy
<template>
  <div>
  <div class="steps">
    <el-steps :active="active" finish-status="success">
      <el-step title="确定数量"></el-step>
      <el-step title="填写地址"></el-step>
      <el-step title="下单购买"></el-step>
    </el-steps>

  </div>

  <!--确定数量-->
  <div v-if="numberShow">

    <el-card class="goods-card" >
      <div class="clearfix">
        <span>{{goods.name}}</span>
      </div>

      <div  >
        <img v-bind:src="goods.img" class="goods-content-main-image">
        <div class="goods-content-main-text">
          <span>商品总数: {{goods.number}}</span><br><br>
          <span>销售地: {{goods.area}}</span><br><br>
          <span>商品描述: <el-input  type="textarea" v-model="goods.description"></el-input></span><br><br>
          <span>卖家用户名 : {{orders.merchant}}</span><br><br>
          <span>发布时间: {{goods.createTime}}</span><br><br>
          <span><font color="red">商品价格 : {{orders.price}}元</font></span><br><br>
          <span><font color="red">购买数量</font>:<el-input-number v-model="orders.number"  :min="1" :max="goods.number"  @change="handleChange"></el-input-number></span>
        </div>
      </div>
      <el-button style="margin-top: 12px;margin-left: 400px"  round @click="next">下一步</el-button>
    </el-card>

  </div>

  <div v-if="addressShow">
    <div>
    <el-form :model="orders" :rules="rules" ref="orders" label-width="100px" class="logincontainer">
      <el-form-item label="收货人:" prop="username">
        <el-input type="text" maxlength="12" v-model="orders.username"></el-input>
      </el-form-item>
      <el-form-item  label="联系电话:" prop="telephone">
        <el-input type="number" v-model="orders.telephone"></el-input>
      </el-form-item>
      <el-form-item label="收货地址:" prop="address" >
        <el-input type="text" maxlength="255"  v-model="orders.address" placeholder="请输入详细的地址~~~"></el-input>
      </el-form-item>
      <el-form-item label="备注:"  >
        <el-input type="textarea"  maxlength="255" v-model="orders.remarks" placeholder="有什么备注尽管说~~"></el-input>
      </el-form-item>
      <el-form-item>
        <el-button style="margin-top: 30px;margin-left: 180px"  round @click="next1('orders')">下一步</el-button>
      </el-form-item>
    </el-form>
    </div>
  </div>

  <div v-if="buyShow">
    <div>
      <el-form :model="orders" label-width="100px" class="logincontainer">
        <el-form-item label="商品名" >
          <el-input type="text" :disabled="true" v-model="orders.name"></el-input>
        </el-form-item>
        <el-form-item label="收货人:">
          <el-input type="text" :disabled="true" v-model="orders.username"></el-input>
        </el-form-item>
        <el-form-item label="收货地址:"  >
          <el-input type="text" :disabled="true"  v-model="orders.address" placeholder="请输入详细的地址~~~"></el-input>
        </el-form-item>
        <el-form-item label="数量:"  >
          <span style="text-align: left"><font color="red">{{orders.number}}</font></span>
        </el-form-item>
        <el-form-item label="总价:"  >
          <span><font color="red">{{orders.price}}元</font></span>
        </el-form-item>

        <el-form-item>
          <el-button  style="margin-top: 30px;margin-left: 180px"  round @click="next2()">购买</el-button>
        </el-form-item>
      </el-form>
    </div>
  </div>

  </div>
</template>

<script>
    export default {
      name: "GoodsBuy",
      data() {
        return {
          active: 0,
          numberShow: true,
          addressShow: false,
          buyShow: false,
          goods: {},
          orders: {
            name: '', //商品名
            merchant: '', //卖家
            number: 1, //数量
            price: "", //总价
            username: '',//收货人姓名
            telephone: '', //手机号
            address: '',//收获地址
            remarks: '无',//备注
            status: 1,//默认未发货
            uid: this.$store.state.userInfo.id,//买家id
            mid: '',//卖家id
          },
          rules: {
            username: [
              { required: true, message: '请输入用户名!', trigger: 'blur' },
              { min: 1, max:12, message: '长度在 1 到 12 个字符', trigger: 'blur' }
            ],
            telephone: [
              { required: true, message: '请输手机号!', trigger: 'blur'},
              { min: 11, message: '请输入正确的手机号', trigger: 'blur' }
            ],
            address: [
              { required: true, message: '请输地址!', trigger: 'blur'},
            ]
          }
        };
      },

      methods: {
        next() {
          if (this.active++ > 2) this.active = 0;
          this.numberShow = false
          this.addressShow = true
        },
        next1(orders) {
          this.$refs[orders].validate((valid) => {
              if (valid) {
                this.active = 2;
                this.addressShow = false
                this.buyShow = true
              } else {
                console.log('error submit!!');
                return false;
              }
          });
        },
        next2() {
          //执行购买 首先判断是否够钱买
          let _this = this
          if(_this.$store.state.userInfo.coin < _this.orders.price){
            this.$confirm('您当前余额不足,请前往充值~~', '提示', {
              confirmButtonText: '确定',
              cancelButtonText: '取消',
              type: 'warning'
            }).then(() => {
              _this.$router.push("/userMenu")
            }).catch(() => {
              //关闭不做操作
            });
          }
          //购买 向后端传递order对象
          console.log("===向后端传递")
          console.log(_this.orders)
          _this.$axios.post("/order/buy?gid="+_this.goods.id,_this.orders,{
            headers: {
              "Authorization": localStorage.getItem("token") //要登录
            }
          }).then(res => {
            _this.$router.push("/mall")
            const h = _this.$createElement;
            _this.$notify({
              message: h('i', {style: 'color: blue'}, '商品预购成功,等待卖家代购!')
            });
          })

          if (this.active++ > 2) this.active = 0;
        },
        //计算价格
        handleChange() {
          let _this = this
          _this.orders.price = _this.goods.price * _this.orders.number
        }
      },
      //先对订单某些数据预加载
      mounted() {
        let _this = this
        _this.goods = _this.$route.params.goods //获取路由url中的参数
        let g = _this.goods
        console.log("=====下单获取到的商品数据·")
        console.log(g);
        _this.orders.name = g.name
        _this.orders.mid = g.uid
        _this.orders.price = g.price
        //获取卖家名
        _this.$axios.get("/user/getUserName?id="+_this.orders.mid,{
          headers: {
            "Authorization": localStorage.getItem("token") //要登录
          }
        }).then(res => {
          _this.orders.merchant = res.data.data
        })
      }
    }
</script>

<style scoped>
  .steps{
    margin: 20px auto;
    width: 700px;
    text-align: left;
  }
  .goods-card{
    margin-left: 15%;
    margin-right: 15%;
    text-decoration: none;
    user-select: none;
  }

  .logincontainer {
    border-radius: 15px;
    background-clip: padding-box;
    margin: 90px auto;
    width: 350px;
    padding: 35px 35px 15px 35px;
    background: #fff;
    border: 1px solid #eaeaea;
    box-shadow: 0 0 25px #cac6c6;
  }
</style>


--------路由

{
        path: '/goodsBuy/:goods',   //下单
        name: 'GoodsBuy',
        meta: {
          requireAuth: true  //带有meta:requireAuth: true说明是需要登录字后才能访问的受限资源
        },
        component: GoodsBuy
      },
购物车和商品详情中对于下单的按钮做些调整
--购物车
<el-button size="mini">
          <router-link :to="{name: 'GoodsBuy',params: {goods: scope.row}}"  :underline="false"  style="text-decoration: none">
            下单
          </router-link>
        </el-button>

--商品详情

<el-button type="danger" icon="el-icon-goods" round  ><router-link :to="{name: 'GoodsBuy',params: {goods: goods}}"  :underline="false"  style="text-decoration: none" ><font color="white">点击购买</font></router-link></el-button>
后端
OrdersController
package com.zdx.controller;


import com.baomidou.mybatisplus.core.conditions.query.QueryWrapper;
import com.zdx.common.Result;
import com.zdx.entity.Cart;
import com.zdx.entity.Goods;
import com.zdx.entity.Orders;
import com.zdx.entity.User;
import com.zdx.service.CartService;
import com.zdx.service.GoodsService;
import com.zdx.service.OrdersService;
import com.zdx.service.UserService;
import org.apache.shiro.authz.annotation.RequiresAuthentication;
import org.springframework.beans.factory.annotation.Autowired;
import org.springframework.validation.annotation.Validated;
import org.springframework.web.bind.annotation.*;

/**
 * <p>
 *  前端控制器
 * </p>
 *
 * @author 朱德鑫
 * @since 2021-03-25
 */
@RestController
@RequestMapping("/orders")
public class OrdersController {

    @Autowired
    OrdersService ordersService ;

    @Autowired
    GoodsService goodsService;

    @Autowired
    UserService userService;

    @Autowired
    CartService cartService;

    //下单操作
    @RequiresAuthentication
    @PostMapping("/buy")
    public Result buy(@Validated @RequestBody Orders orders,
                      @RequestParam("gid") Long gid){
        /**首先要进行两个操作 判断数量是否足够,其次判断用户余额是否足够
         * 根据gid查找商品数量比较
         * 根据uid查找余额进行比较
         * 如果商品数量为0要删除而且购物车中有关该商品也删除
         */
        Goods goods = goodsService.getById(gid);
        User user = userService.getById(orders.getUid());
        //判断
        if(goods.getNumber() < orders.getNumber()){
            return Result.fail("不好意思,现在商品数量不足,请重新购买~");
        }else if (user.getCoin() < orders.getPrice()){
            return Result.fail("sorry!您的余额不足,请充值!");
        }
        //购买逻辑 购买后 订单状态改为1 未发货 用户余额减少,商品数量减少
        ordersService.save(orders);
        user.setCoin(user.getCoin()-orders.getPrice());
        userService.updateById(user);
        //如果商品数量减到0则删除商品
        if(goods.getNumber() - orders.getNumber() == 0){
            goodsService.removeById(gid);
            //删除购物车中有该商品的
            cartService.remove(new QueryWrapper<Cart>().eq("gid",gid));
        }else {
            goods.setNumber(goods.getNumber() - orders.getNumber());
            goodsService.updateById(goods);
        }
        return Result.success(null);
    }

}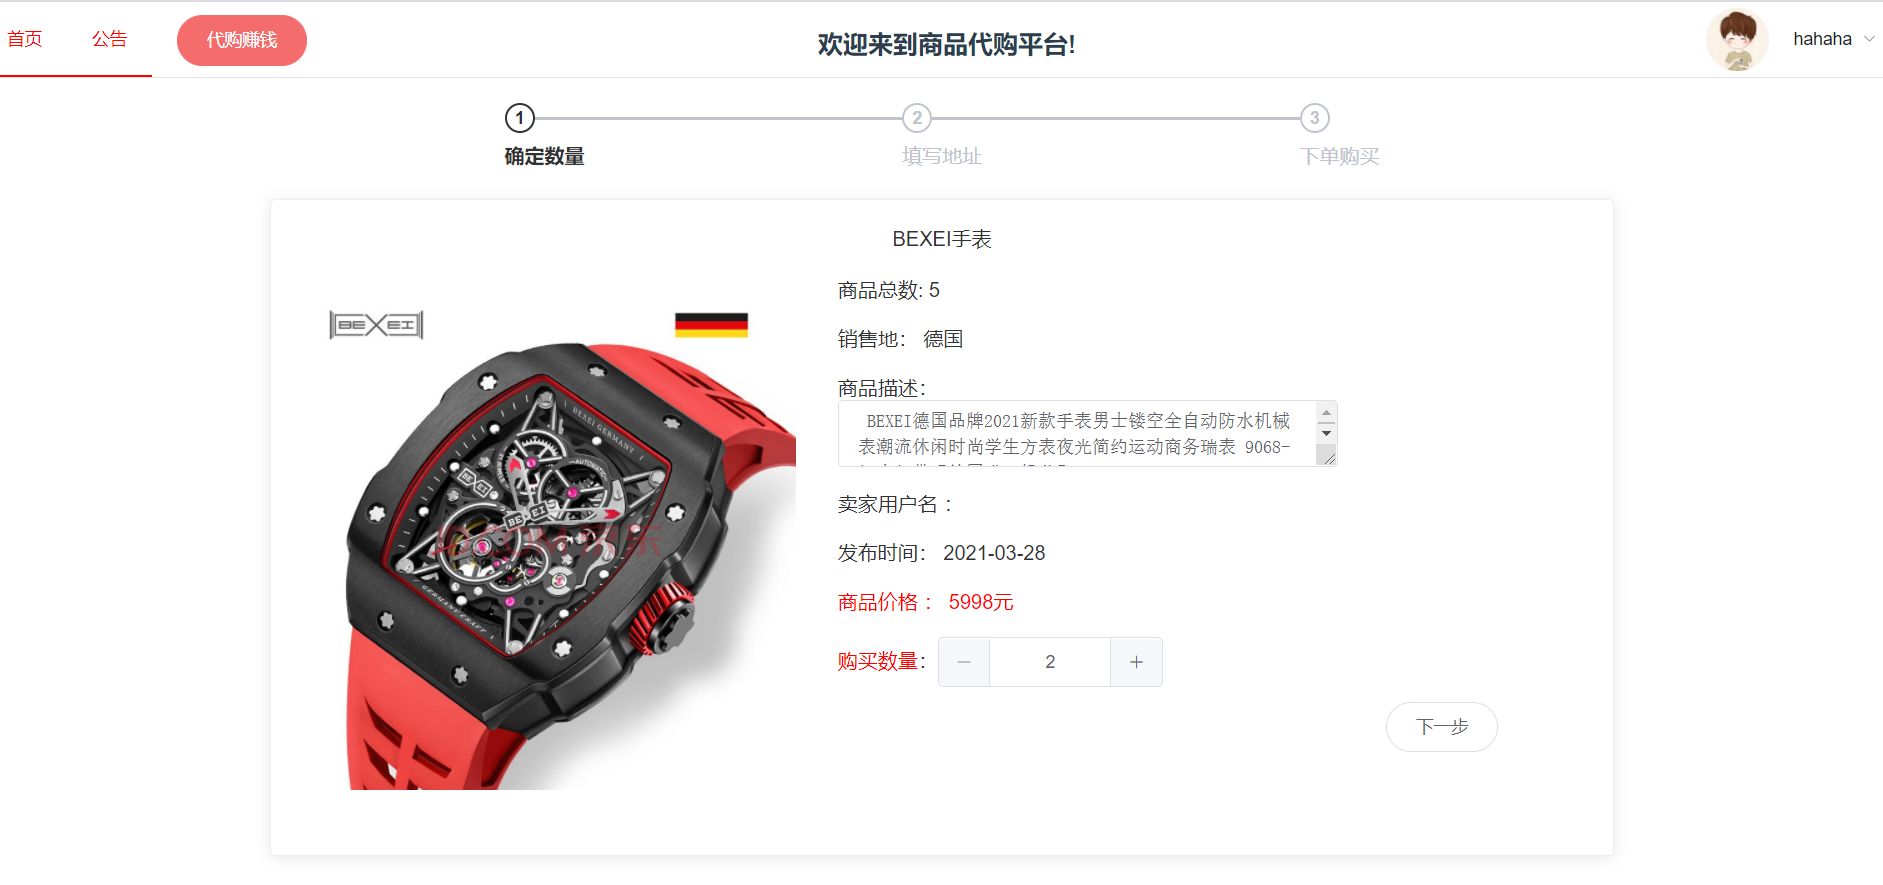
我的订单
我的订单可以查看未发货,已发货,未评价,已完成 四种!
先处理未发货和已发货吧,剩下的把评论完成了再添加
未发货
前端
用于显示购买后未发货的订单,用户可以选择取消订单,订单取消后返回余额,如果商品还在则返回商品数量。
GoodsOrder
<template>
  <div class="profile-trade-list">

    <el-tabs v-model="activeName">
      <el-tab-pane label="未发货" name="first">

        <el-table
          :data="unSendGoods"
          style="width: 100%">
          <el-table-column
            label="日期"
            width="180">
            <template #default="scope">
              <i class="el-icon-time"></i>
              <span style="margin-left: 10px">{{ scope.row.createTime }}</span>
            </template>
          </el-table-column>

          <el-table-column
            label="商品名称:"
            width="180">
            <template #default="scope">
              <span style="margin-left: 10px">{{ scope.row.name }}</span>
            </template>
          </el-table-column>

          <el-table-column
            label="数量"
            width="180">
            <template #default="scope">
              <span style="margin-left: 10px">{{ scope.row.number }}</span>
            </template>
          </el-table-column>

          <el-table-column
            label="价格"
            width="180">
            <template #default="scope">
              <span style="margin-left: 10px">{{ scope.row.price }}</span>
            </template>
          </el-table-column>

          <el-table-column
            label="收货人"
            width="200">
            <template #default="scope">
              <el-popover effect="light" trigger="hover" placement="top">
                <template #default>
                  <p>联系电话: {{ scope.row.telephone }}</p>
                  <p>详细地址: {{ scope.row.address }}</p>
                  <p>订单备注: {{ scope.row.remarks }}</p>
                </template>
                <template #reference>
                  <div class="name-wrapper">
                    <el-tag size="medium">{{ scope.row.username }}</el-tag>
                  </div>
                </template>
              </el-popover>
            </template>
          </el-table-column>

          <el-table-column label="操作">
            <template #default="scope">
              <el-button
                size="mini"
                type="danger"
                @click="handleDelete(scope.$index, scope.row)">取消订单</el-button>
            </template>
          </el-table-column>
        </el-table>
      </el-tab-pane>

      <el-tab-pane label="已发货" name="second">
        <el-table
          :data="unReceiveGoods"
          style="width: 100%">
          <el-table-column
            prop="name"
            label="商品名称"
            width="180">
          </el-table-column>
          <el-table-column
            prop="price"
            label="价格"
            width="180">
          </el-table-column>
          <el-table-column label="操作">
            <template slot-scope="scope">
              <el-button
                size="mini"
              >确认收货</el-button>
            </template>
          </el-table-column>
        </el-table>
      </el-tab-pane>

      <el-tab-pane label="未评价" name="third">
        <el-table
          :data="unRateGoods"
          style="width: 100%">
          <el-table-column
            prop="name"
            label="商品名称"
            width="180">
          </el-table-column>
          <el-table-column
            prop="price"
            label="价格"
            width="180">
          </el-table-column>
          <el-table-column label="操作">
            <template slot-scope="scope">
              <div class="block">
                <el-rate
                  v-model="credit"
                  :colors="['#99A9BF', '#F7BA2A', '#FF9900']">
                </el-rate>
              </div>
              <el-button
                size="mini"
                >评价</el-button>
            </template>
          </el-table-column>
        </el-table>
      </el-tab-pane>
      <el-tab-pane label="已完成" name="fourth">
        <el-table
          :data="finishGoods"
          style="width: 100%">
          <el-table-column
            prop="name"
            label="商品名称"
            width="180">
          </el-table-column>
          <el-table-column
            prop="price"
            label="价格"
            width="180">
          </el-table-column>
        </el-table>
      </el-tab-pane>
    </el-tabs>

  </div>
</template>

<script>
    export default {
      name: "GoodsOrder",
      data() {
        return {
          activeName: 'first',
          UNSEND : 1,
          UNRECEIVE : 2,
          UNRATE : 3,
          FINISH : 4,
          unSendGoods: [],
          unReceiveGoods: [],
          unRateGoods: [],
          finishGoods: [],
          credit : null
        }
      },
      methods: {
        //初始化每个子标签的信息
        InitTradeList(status){
          let _this = this
          _this.$axios.get("/orders/getByUid?uid="+_this.$store.state.userInfo.id+"&status="+status,{
            headers: {
              "Authorization": localStorage.getItem("token") //要登录后才能查
            }
          }).then(res => {
            switch (status) {
              case 1:
                _this.unSendGoods = res.data.data
                break;
              case 2:
                _this.unReceiveGoods = res.data.data
                break;
              case 3:
                _this.unRateGoods = res.data.data
                break;
              case 4:
                _this.finishGoods = res.data.data
                break;
              default: break;
            }
          })
        },

        //取消订单
        handleDelete(index, row) {
          console.log("====取消订单")
          console.log(row)
          //删除操作
          this.$confirm('此操作将永久取消该商品订单, 是否继续?', '提示', {
            confirmButtonText: '确定',
            cancelButtonText: '取消',
            type: 'warning'
          }).then(() => {
            //执行删除
            let _this = this
            _this.$axios.delete("/orders/deleteById?id="+row.id,{
              headers: {
                "Authorization": localStorage.getItem("token") //要登录
              }
            }).then(res => {
              _this.InitTradeList(1)
            })
            this.$message({
              type: 'success',
              message: '取消订单成功!'
            });
          }).catch(() => {
            this.$message({
              type: 'info',
              message: '已撤销'
            });
          });
        }
      },
      //挂载所有订单数据
      mounted() {
        for(let i = 1; i <= 4; i++){
          this.InitTradeList(i)
        }
      }
    }
</script>

<style scoped>

</style>


-----------------------------------
---因为我们这个页面时集成在我的订单里所以要在UserMenu中注册
-----------------

 <el-tab-pane label="我的订单">
        <GoodsOrder></GoodsOrder>
</el-tab-pane>


import GoodsOrder from "./GoodsOrder";

  export default {

    name: "UserMenu",
    components: {UserList,MyGoods,GoodsCart,GoodsOrder},
后端
OrdersController
//根据用户id和订单状态获取订单信息
@RequiresAuthentication
@GetMapping("/getByUid")
public Result getByUid(@RequestParam("uid") Long uid,
                        @RequestParam("status") Integer status){
    List<Orders> ordersList = ordersService.list(new QueryWrapper<Orders>().eq("uid",uid).eq("status",status));
    return Result.success(ordersList);
}

/**取消订单
  *
  * 订单取消后需要返还用户的余额
  * 返回商品数量,其中需要判断商品是否还存在,存在则返回数量
  */
@RequiresAuthentication
@DeleteMapping("/deleteById")
public Result deleteById(@RequestParam("id") Long id){
    Orders orders = ordersService.getById(id);
    //还钱
    User user = userService.getById(orders.getUid());
    user.setCoin(orders.getPrice()+user.getCoin());
    userService.updateById(user);
    //判断商品是否存在
    Goods goods = goodsService.getById(orders.getGid());
    if(goods != null){
        goods.setNumber(goods.getNumber()+orders.getNumber());
        goodsService.updateById(goods);
    }
    ordersService.removeById(id);
    return Result.success(null);
}
发货信息
和上面一样都需要去UserMenu中注册
SendGoods
<template>
    <div>
      <el-table
        :data="orders"
        style="width: 100%">
        <el-table-column
          label="订单日期"
          width="180">
          <template #default="scope">
            <i class="el-icon-time"></i>
            <span style="margin-left: 10px">{{ scope.row.createTime }}</span>
          </template>
        </el-table-column>

        <el-table-column
          label="商品名称:"
          width="180">
          <template #default="scope">
            <span style="margin-left: 10px">{{ scope.row.name }}</span>
          </template>
        </el-table-column>

        <el-table-column
          label="数量"
          width="180">
          <template #default="scope">
            <span style="margin-left: 10px">{{ scope.row.number }}</span>
          </template>
        </el-table-column>

        <el-table-column
          label="收货人"
          width="200">
          <template #default="scope">
            <el-popover effect="light" trigger="hover" placement="top">
              <template #default>
                <p>联系电话: {{ scope.row.telephone }}</p>
                <p>详细地址: {{ scope.row.address }}</p>
                <p>订单备注: {{ scope.row.remarks }}</p>
              </template>
              <template #reference>
                <div class="name-wrapper">
                  <el-tag size="medium">{{ scope.row.username }}</el-tag>
                </div>
              </template>
            </el-popover>
          </template>
        </el-table-column>

        <el-table-column
          label="订单状态"
          width="180">
          <template #default="scope">
            <span style="margin-left: 10px">待发货</span>
          </template>
        </el-table-column>

        <el-table-column label="操作">
          <template #default="scope">
            <el-button
              size="mini"
              type="danger"
              @click="handleSend(scope.$index, scope.row)">发送订单</el-button>
          </template>
        </el-table-column>
      </el-table>
    </div>
</template>

<script>
  export default {
    name: "SendGoods",
    data() {
      return {
        orders: []
      }
    },
    methods: {
      loadGoods(){
        let _this = this
        _this.$axios.get("/orders/getByMid?mid="+_this.$store.state.userInfo.id,{
          headers: {
            "Authorization": localStorage.getItem("token") //要登录后才能查
          }
        }).then(res => {
          console.log("发货订单")
          console.log(res)
          _this.orders = res.data.data
        })
      },
      handleSend(index,row){
        let _this = this
        _this.$axios.post("/orders/sendOrders?id="+row.id,null,{
          headers: {
            "Authorization": localStorage.getItem("token") //要登录后才能查
          }
        }).then(res => {
          _this.loadGoods()
          this.$message({
            type: 'success',
            message: '订单发送成功!'
          });
        })
      }
    },
    mounted() {
      this.loadGoods();
    }
  }
</script>

<style scoped>

</style>
OrdersController
//获取卖家的未发货订单
   @RequiresAuthentication
   @GetMapping("/getByMid")
   public Result getByMid(@RequestParam("mid") Long mid){
       List<Orders> ordersList = ordersService.list(new QueryWrapper<Orders>().eq("mid",mid).eq("status",1));
       return Result.success(ordersList);
   }

   //发送订单
   @RequiresAuthentication
   @PostMapping("/sendOrders")
   public Result sendOrders(@RequestParam("id") Long id){
       Orders orders = ordersService.getById(id);
       orders.setStatus(2);
       ordersService.updateById(orders);
       return Result.success(null);
   }
确认收获
GoodsOrder
<el-tab-pane label="已发货" name="second">
  <el-table
    :data="unReceiveGoods"
    style="width: 100%">
    <el-table-column
      label="订单日期"
      width="180">
      <template #default="scope">
        <i class="el-icon-time"></i>
        <span style="margin-left: 10px">{{ scope.row.createTime }}</span>
      </template>
    </el-table-column>

    <el-table-column
      label="商品名称:"
      width="180">
      <template #default="scope">
        <span style="margin-left: 10px">{{ scope.row.name }}</span>
      </template>
    </el-table-column>

    <el-table-column
      label="数量"
      width="180">
      <template #default="scope">
        <span style="margin-left: 10px">{{ scope.row.number }}</span>
      </template>
    </el-table-column>

    <el-table-column
      label="总价"
      width="180">
      <template #default="scope">
        <span style="margin-left: 10px">{{ scope.row.price }}</span>
      </template>
    </el-table-column>

    <el-table-column
      label="收货人"
      width="200">
      <template #default="scope">
        <el-popover effect="light" trigger="hover" placement="top">
          <template #default>
            <p>联系电话: {{ scope.row.telephone }}</p>
            <p>详细地址: {{ scope.row.address }}</p>
            <p>订单备注: {{ scope.row.remarks }}</p>
          </template>
          <template #reference>
            <div class="name-wrapper">
              <el-tag size="medium">{{ scope.row.username }}</el-tag>
            </div>
          </template>
        </el-popover>
      </template>
    </el-table-column>


    <el-table-column label="操作">
      <template #default="scope">
        <el-button
          size="mini"
          type="danger"
          @click="handleGet(scope.$index, scope.row)">确认收货</el-button>
      </template>
    </el-table-column>
  </el-table>
</el-tab-pane>
--------------------------------------------
//确认收获
handleGet(index, row){
  let _this = this
  _this.$axios.post("/orders/ordersGet?id="+row.id,null,{
    headers: {
      "Authorization": localStorage.getItem("token") //要登录
    }
  }).then(res => {
    _this.InitTradeList(2)
    this.$message({
      type: 'success',
      message: '收获成功记得评价哦!!!'
    });
  })
}
OrdersController
 /**
  *  确认收货
  *  1.收获后修改订单状态
  *  2.既然收到货了那当然是给卖家钱
  */
@RequiresAuthentication
@PostMapping("/ordersGet")
public Result ordersGet(@RequestParam("id") Long id){
    Orders orders= ordersService.getById(id);
    orders.setStatus(3);
    //还钱
    User user = userService.getById(orders.getMid());
    user.setCoin(user.getCoin()+orders.getPrice());

    userService.updateById(user);
    ordersService.updateById(orders);

    return Result.success(null);
}
未评价
<el-tab-pane label="未评价" name="third">
  <el-table
    :data="unRateGoods"
    style="width: 100%">
    <el-table-column
      label="订单日期"
      width="180">
      <template #default="scope">
        <i class="el-icon-time"></i>
        <span style="margin-left: 10px">{{ scope.row.createTime }}</span>
      </template>
    </el-table-column>

    <el-table-column
      label="商品名称:"
      width="180">
      <template #default="scope">
        <span style="margin-left: 10px">{{ scope.row.name }}</span>
      </template>
    </el-table-column>

    <el-table-column
      label="数量"
      width="180">
      <template #default="scope">
        <span style="margin-left: 10px">{{ scope.row.number }}</span>
      </template>
    </el-table-column>

    <el-table-column
      label="总价"
      width="180">
      <template #default="scope">
        <span style="margin-left: 10px">{{ scope.row.price }}</span>
      </template>
    </el-table-column>

    <el-table-column
      label="收货人"
      width="200">
      <template #default="scope">
        <el-popover effect="light" trigger="hover" placement="top">
          <template #default>
            <p>联系电话: {{ scope.row.telephone }}</p>
            <p>详细地址: {{ scope.row.address }}</p>
            <p>订单备注: {{ scope.row.remarks }}</p>
          </template>
          <template #reference>
            <div class="name-wrapper">
              <el-tag size="medium">{{ scope.row.username }}</el-tag>
            </div>
          </template>
        </el-popover>
      </template>
    </el-table-column>
    <el-table-column label="操作">
      <template slot-scope="scope">
        <div class="block">
          <el-rate
            allow-half
            show-score
            text-color="#ff9900"
            v-model="credit"
            :colors="['#99A9BF', '#F7BA2A', '#FF9900']">
          </el-rate>
        </div>
        <el-button
          size="mini"
          type="danger"
          @click="rateSeller(scope.$index, scope.row)">打分</el-button>
      </template>
    </el-table-column>
  </el-table>
</el-tab-pane>
OrdersController
//评价 低于三分则减信誉 修改订单状态
@RequiresAuthentication
@PostMapping("/userCredit")
public Result userCredit(@RequestParam("credit") int credit,
                          @RequestParam("ordersId") Long id){
    Orders orders = ordersService.getById(id);
    User user = userService.getById(orders.getUid());

    if(credit < 3){
        user.setCredit(user.getCredit() - (5 - credit));
    }else {
        user.setCredit(user.getCredit() + credit);
    }

    orders.setStatus(4);
    ordersService.updateById(orders);
    userService.updateById(user);

    return Result.success(null);
}